

0 - Introduction
Did you know that if you use Jellyfin you can get your favorite series to download automatically when they release? With a couple of different containers, you can easily monitor and manage your gallery.
Keep in mind that this article needs docker, you can learn how to install it here.
You can find a single docker compose file solution at the end of the article, but we will go through all containers one by one.
1 - Setup
Let’s start by setting up all containers. As we already have a tutorial for jellyfin, you can read it in this article.
After installing Jellyfin, you can continue this article.
mkdir servarr
cd servarr
mkdir sonarr
mkdir radarr
mkdir prowlarr
mkdir flaresolverr
mkdir transmission
A) Install Transmission
We will start by installing ‘Transmission‘. This is the container that will download our movies and series. I chose transmission simply because I like it, but this container image in specific also gives us the ability to use a vpn for downloading stuff. This greatly increases security and also prevents some ISPs from blocking or blacklisting your IP.
In the Transmission folder, create a docker compose file and paste the following config:
cd transmission
nano docker-compose.yml
services:
transmission-openvpn:
image: haugene/transmission-openvpn:latest
container_name: servarr_transmission
cap_add:
- NET_ADMIN
devices:
- /dev/net/tun
environment:
- OPENVPN_PROVIDER=PROTONVPN
- OPENVPN_CONFIG= # config name without '.ovpn'
- OPENVPN_USERNAME= # open vpns username
- OPENVPN_PASSWORD= # open vpns password
- PUID=1000
- PGID=1000
- TZ=Etc/UTC
- LOCAL_NETWORK=192.168.1.0/24 # change to match your local network
# - DISABLE_PORT_UPDATER=true # if you get errors with your vpn, you can try enabling this
volumes:
- ./config/:/data
- ./vpn/:/config/
- ./watch:/watch
- /share/downloads:/downloads # change this
ports:
- "9001:9091" # web ui port
- "51413:51413" # torrent peer port
- "51413:51413/udp" # torrent peer port
restart: unless-stopped
dns:
- 1.1.1.1 # cloudflare
- 8.8.8.8 # googleAfter saving the file, run the container and after a minute or two stop it. You can use the command below to start it, and press CTRL+C to stop it.
docker compose upWe now need to add our openvpn config. You can get that config on your vpn provider’s website, for ProtonVPN, you can get it at the downloads folder.
The config then needs to be placed at:
./vpn/vpn-configs-contrib/openvpn/protonvpnYou might need to use ‘sudo cp from to’ to copy the file.
After copying this config file, make sure that the port 51413 is open, and run the container again:
docker compose up -dThe transmission web ui can be accessed at:
http://yourmachineip:9001B) Install Sonarr
Now we will install ‘Sonarr‘, the container that will manage our series and TV shows.
Let’s move into the sonarr folder and create the docker compose file:
cd ../sonarr
nano docker-compose.yml
services:
sonarr:
image: lscr.io/linuxserver/sonarr:latest
container_name: servarr_sonarr
environment:
- PUID = 1000
- PGID = 1000
- TZ=Etc/UTC
volumes:
- ./data:/config
- /share/media:/media # change this
- /share/downloads:/downloads # change this
ports:
- "9002:8989"
restart: unless-stoppedAfter saving, run the container and go to it’s web ui:
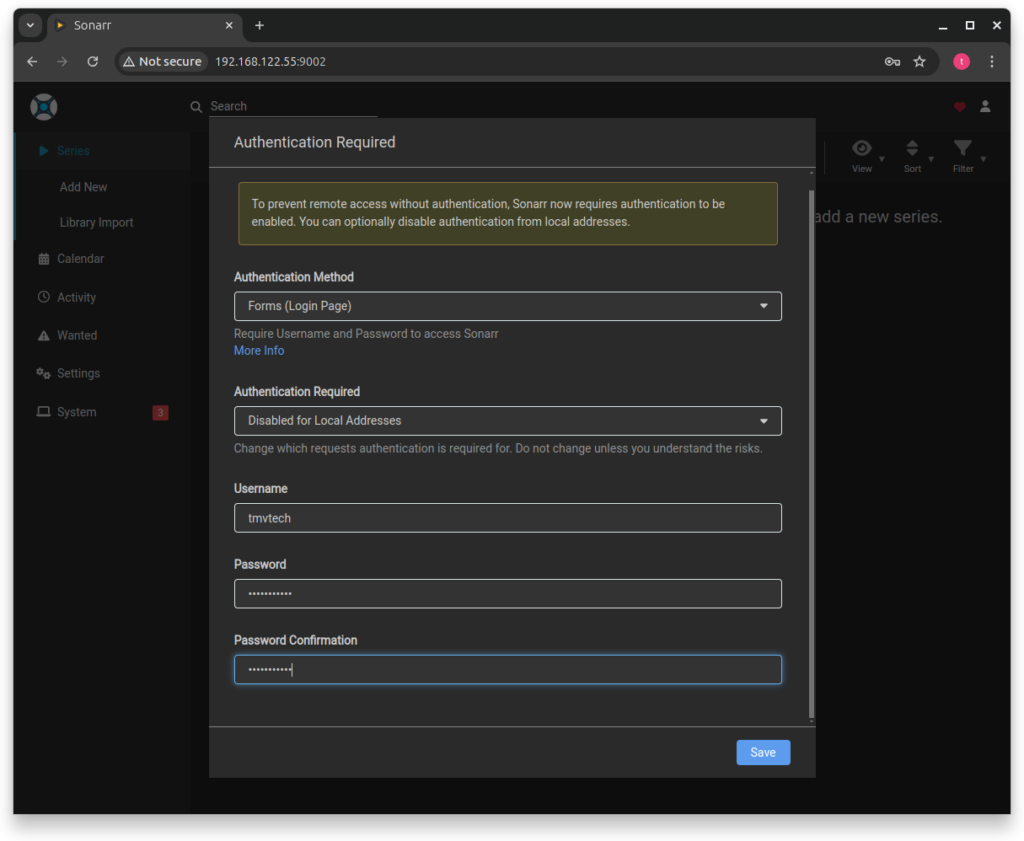
docker compose up -dhttp://yourmachineip:9002In the web ui, create your user and set the authentication method to ‘Login Page’ and ‘Authentication Required’ to the one you prefer.
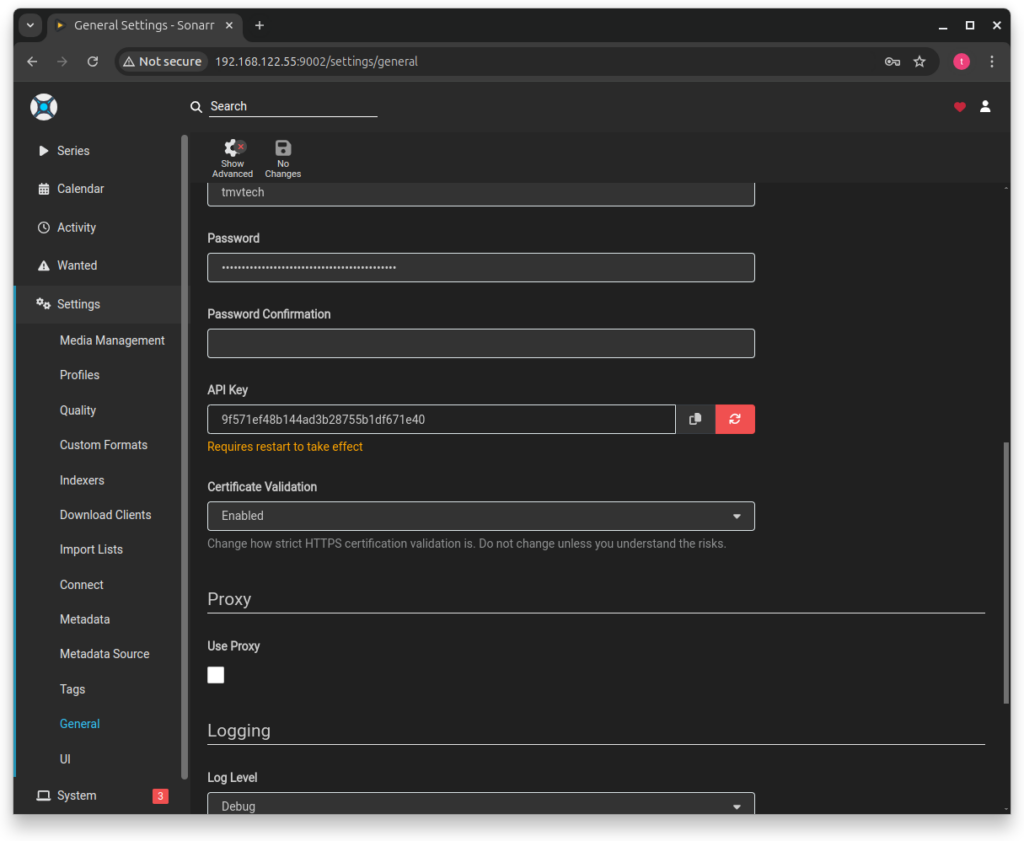
Then, go to ‘Settings -> General’ and get the ‘API Key’ and save it for later.
C) Install Radarr
Now we will install ‘Radarr‘, the container that will manage our movies.
Let’s move into the sonarr folder and create the docker compose file:
cd ../radarr
nano docker-compose.yml
services:
radarr:
image: lscr.io/linuxserver/radarr:latest
container_name: servarr_radarr
environment:
- PUID=1000
- PGID=1000
- TZ=Etc/UTC
volumes:
- ./data:/config
- /share/media:/media
- /share/downloads:/downloads
ports:
- "9003:7878"
restart: unless-stoppedAfter saving, run the container and go to it’s web ui:
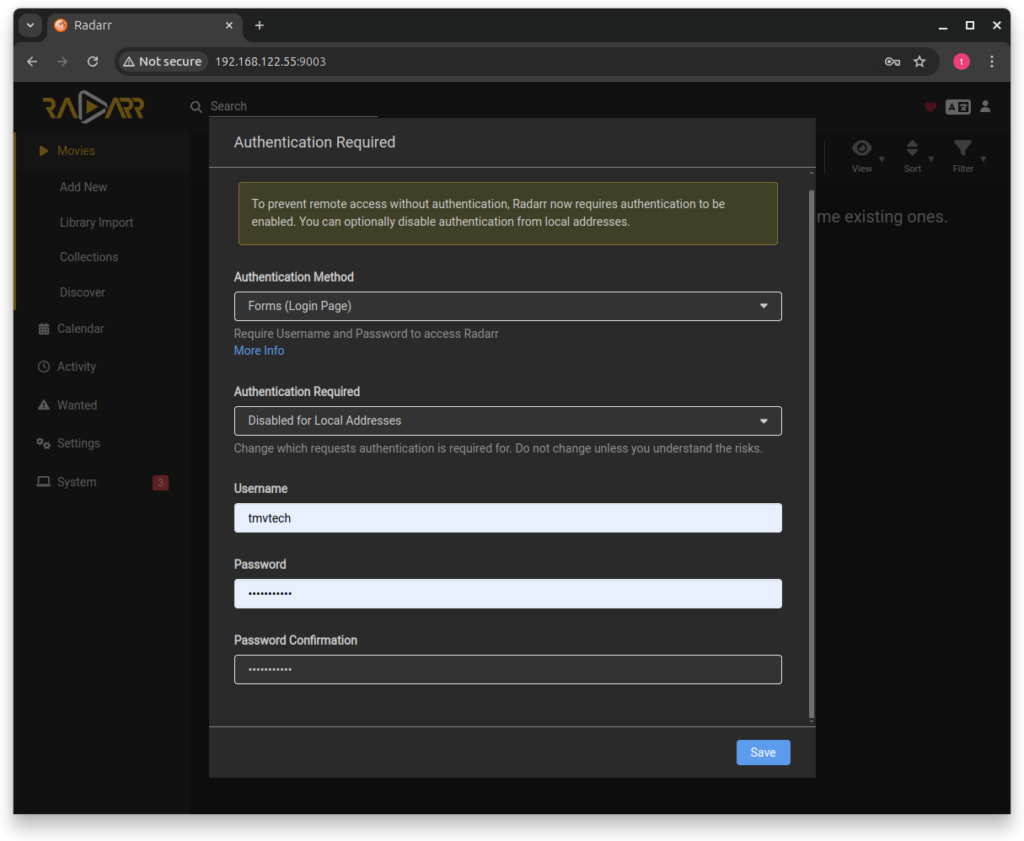
docker compose up -dhttp://yourmachineip:9003In the web ui, again, create your user and set the authentication method to ‘Login Page’ and ‘Authentication Required’ to the one you prefer.
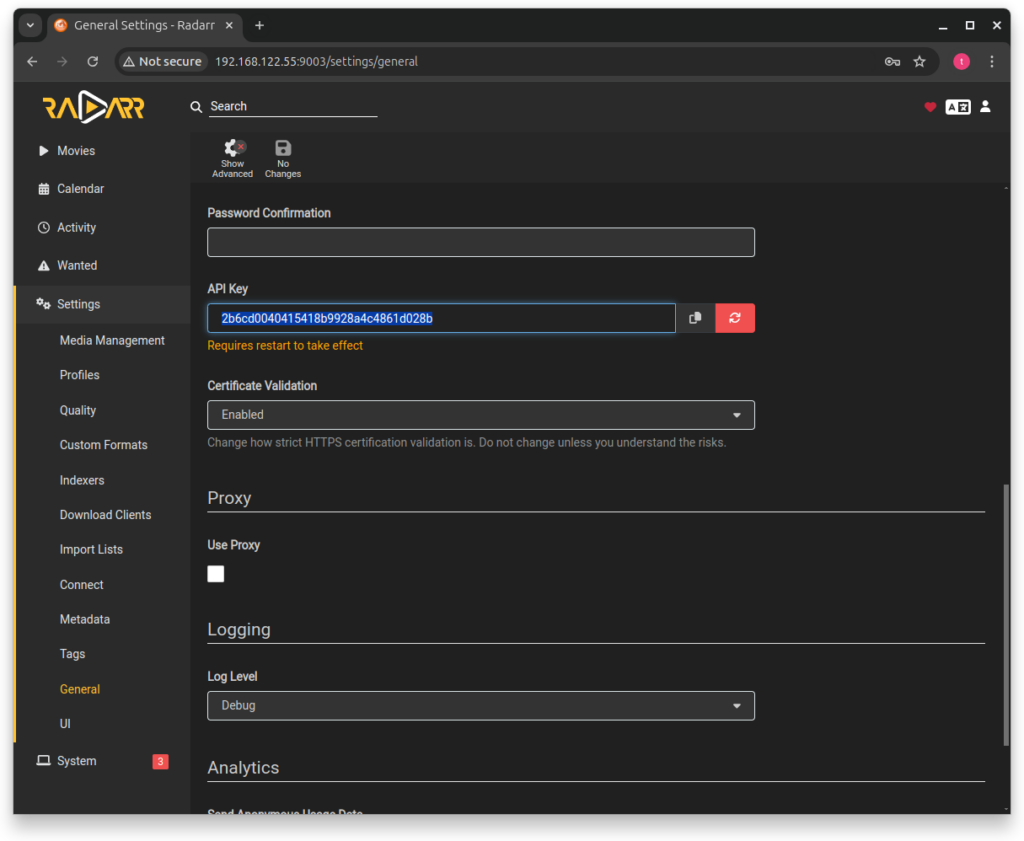
Then, like before, go to ‘Settings -> General’, get the ‘API Key’ and save it for later.
D) Install Prowlarr
Now we will install ‘Prowlarr‘, the container that will manage our indexers.
Let’s move into the prowlarr folder and create the docker compose file:
cd ../prowlarr
nano docker-compose.yml
services:
prowlarr:
image: lscr.io/linuxserver/prowlarr:latest
container_name: servarr_prowlarr
environment:
- PUID=1000
- PGID=1000
- TZ=Etc/UTC
volumes:
- ./data:/config
ports:
- "9004:9696"
restart: unless-stoppedAfter saving, run the container and go to it’s web ui:
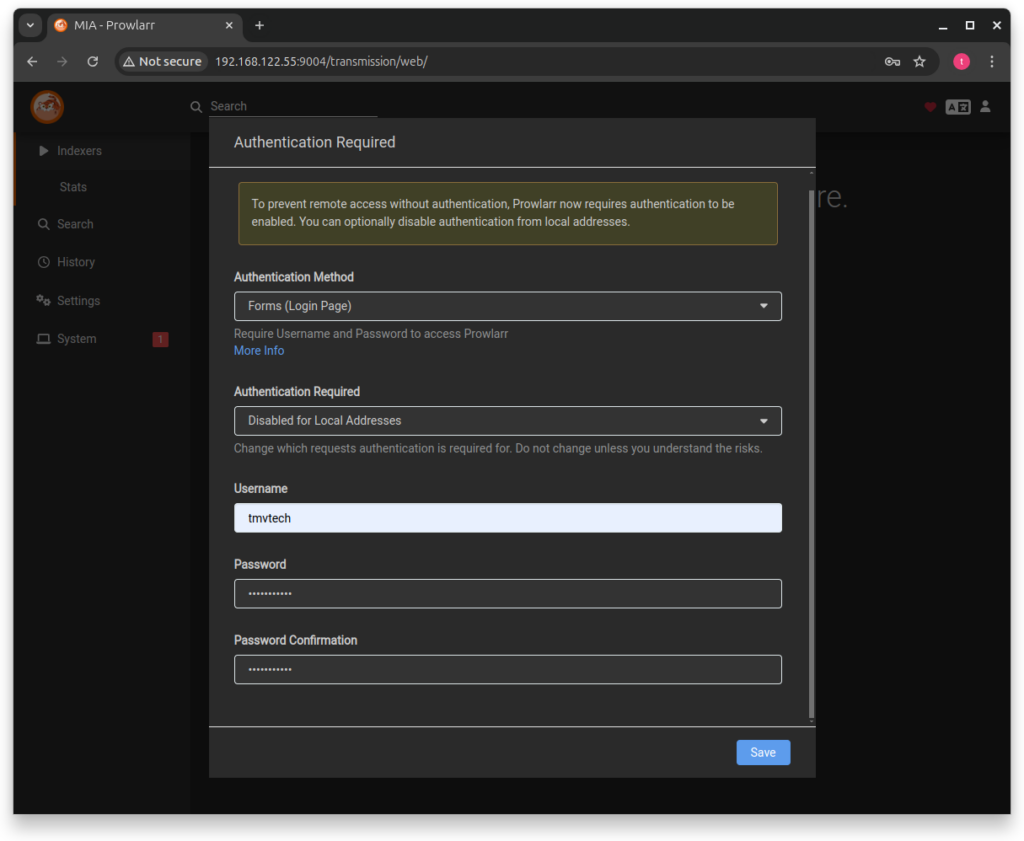
docker compose up -dhttp://yourmachineip:9004In the web ui, for the last time, create your user and set the authentication method to ‘Login Page’ and ‘Authentication Required’ to the one you prefer.
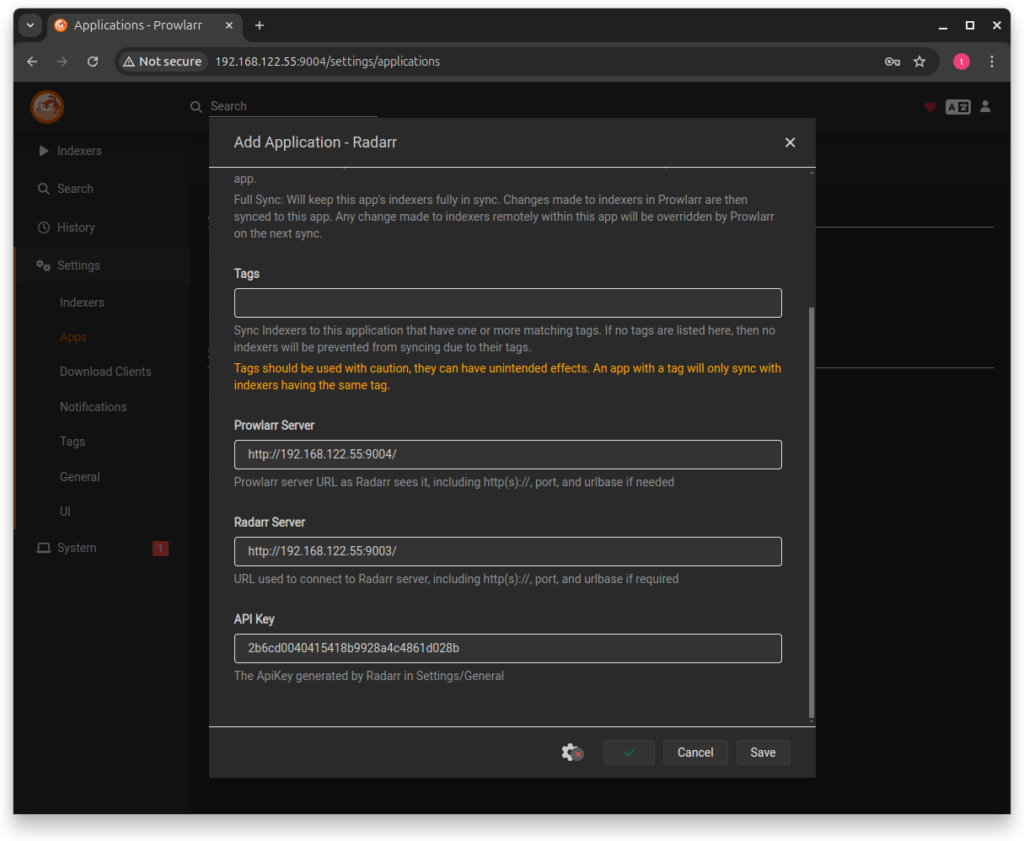
Then, go to ‘Settings -> Apps’ and in ‘Applications’ click the + sign, then select Radarr or Sonarr, input the address for both Prowlarr and the others and their api key. Leave ‘Tags’ empty!
Finally go to ‘Indexers’ and add some by pressing the blue ‘Add New Indexer’ button.
You might notice though, that a lot of indexers use Cloudflare and, because of that, we will need another container.
E) Install FlareSolverr
Now we will install ‘FlareSolverr‘, this container will solve the cloudflare captchas, allowing us to use more indexers.
Let’s move into the flaresolverr folder and create the docker compose file:
cd ../flaresolverr
nano docker-compose.yml
services:
flaresolverr:
# DockerHub mirror flaresolverr/flaresolverr:latest
image: ghcr.io/flaresolverr/flaresolverr:latest
container_name: servarr_flaresolverr
environment:
- LOG_LEVEL=${LOG_LEVEL:-info}
- LOG_HTML=${LOG_HTML:-false}
- CAPTCHA_SOLVER=hcaptcha-solver
- TZ=Etc/UTC
ports:
- "9005:8191"
restart: unless-stoppedAfter saving the file you can start the container:
docker compose up -dThen, going back to Prowlarr, we will go to ‘Settings -> Indexers’ and click the + sign under ‘Indexer Proxies’, then add the tag ‘flaresolverr’ and the address, test and save.
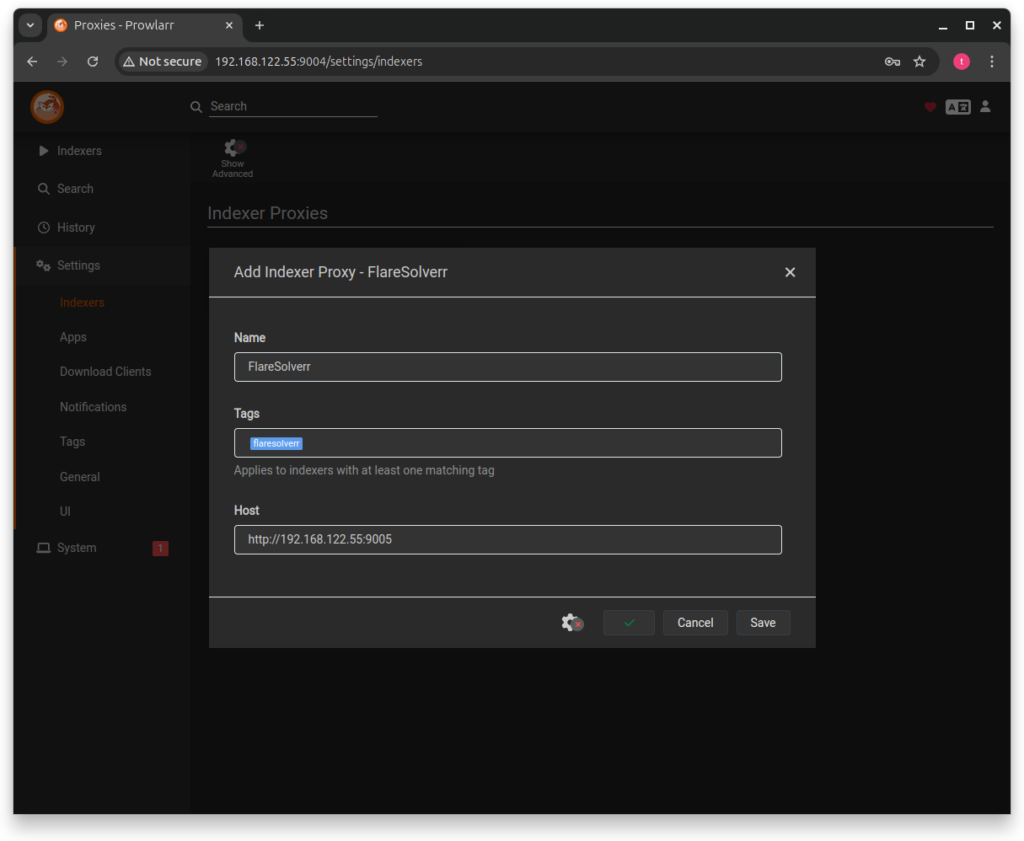
Then, for indexers that require flaresolverr, you add the tag and it just works!
Bonus - Homarr Dashboard
If you want a place to see everything that is happening to your containers at the same time, ‘Homarr‘ is a great option.
cd ..
mkdir homarr
cd homarr
nano docker-compose.yml
services:
homarr:
container_name: servarr_homarr
image: ghcr.io/ajnart/homarr:latest
restart: unless-stopped
volumes:
- ./data/configs:/app/data/configs
- ./data/data:/data
- ./data/icons:/app/public/icons
ports:
- '9000:7575'After saving, run the container and go to it’s web ui:
docker compose up -dhttp://yourmachineip:9000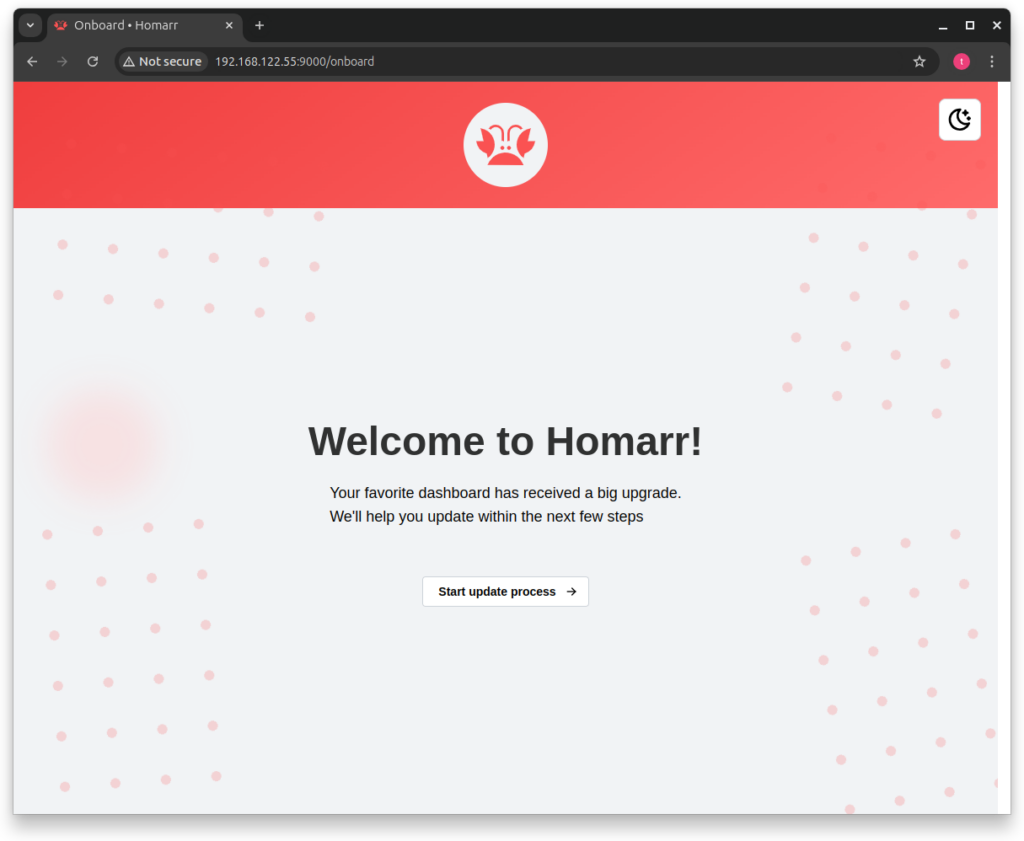
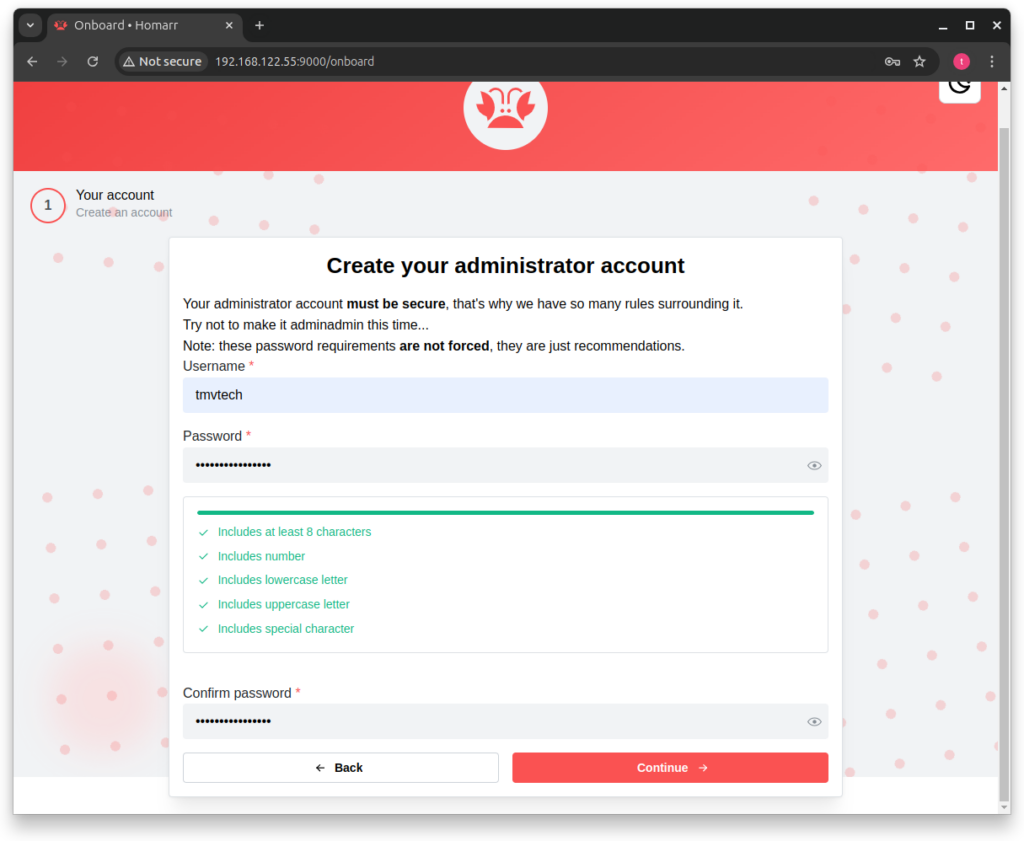
After click the ‘Start update process’, you will need to type a username and a password for your admin account, then press ‘Continue’.
Then click ‘Go to your board’ and you will see this:
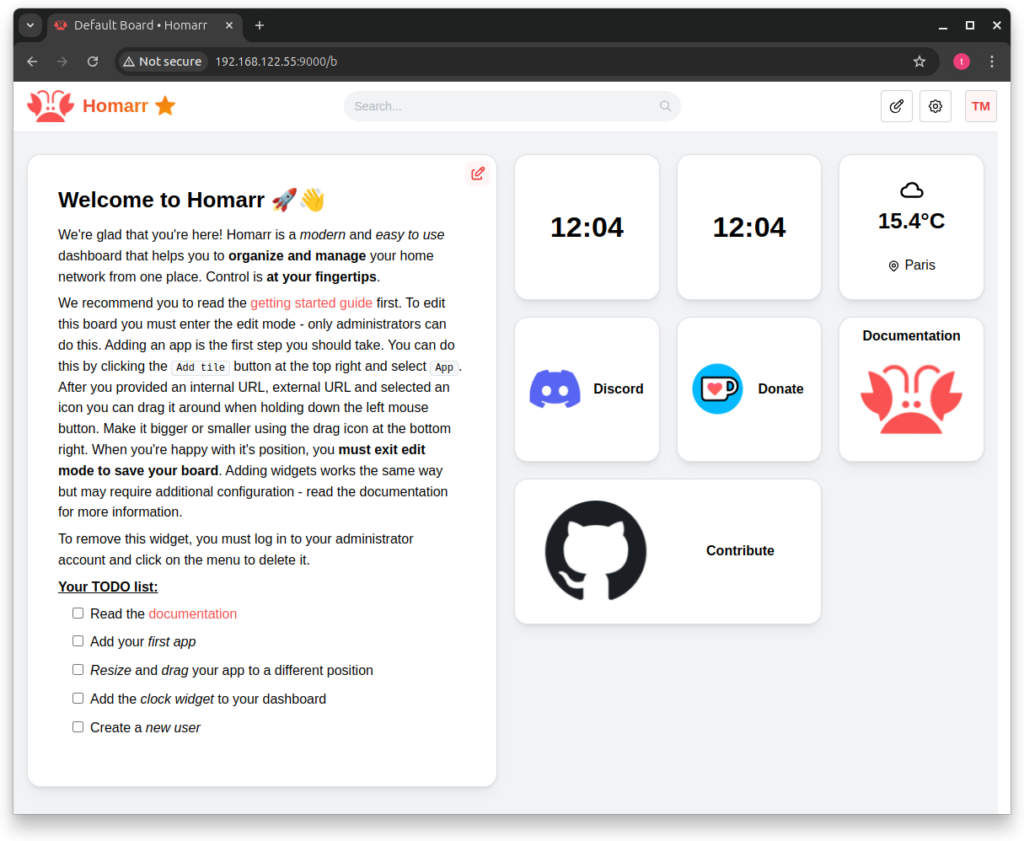
You can then customize your board, add applications and widgets and make your perfect dashboard!
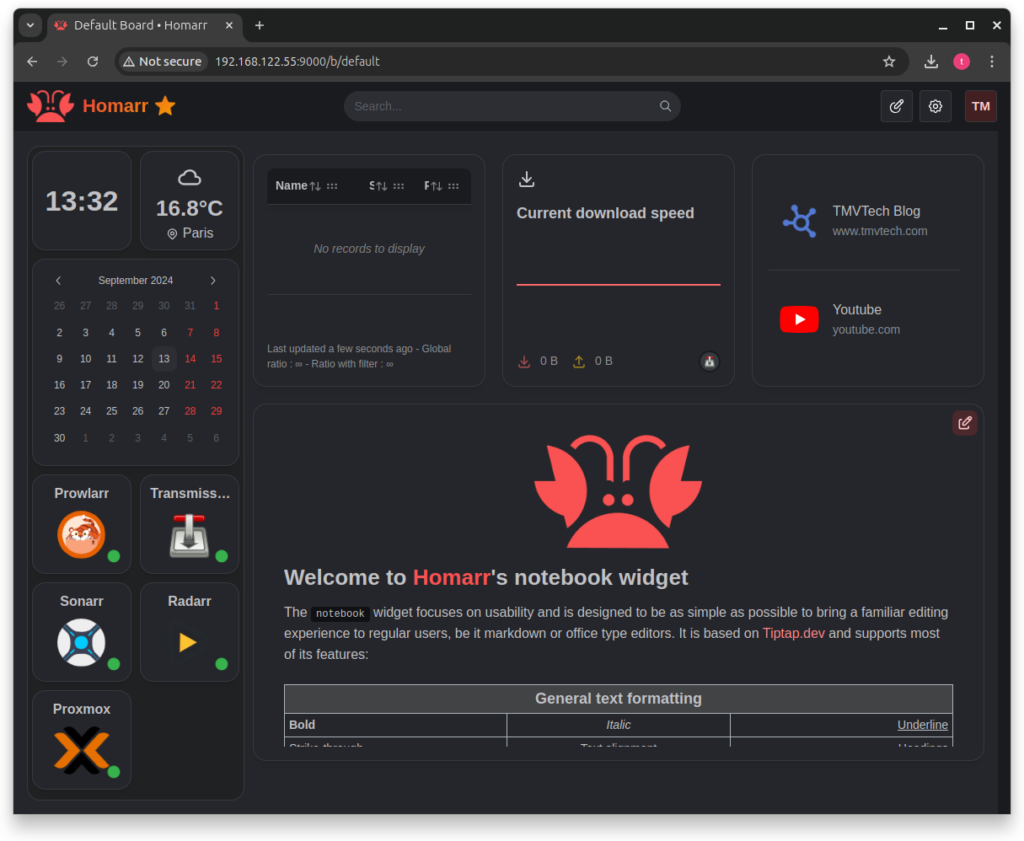
With homarr’s app integrations you can see a list of you downloads, the speed of them and a lot more. It also has integrations with Proxmox to keep tabs on your VMs.
Final - Single file solution
Before finishing, here is a single file that hosts all containers:
# edit variables here \/
x-common:
  volumes:
    - &var-downloads /share/downloads:/data
    - &var-media /share/media:/media
  ports:
    JELLYFIN_WEBUI: &port-jellyfin-ui "9000:8096" # web ui port
    JELLYFIN_UDP1: &port-jellyfin-u1 "7359:7359/udp"
    JELLYFIN_UDP2: &port-jellyfin-u2 "1900:1900/udp"

    TRANSMISSION_WEBUI: &port-tmw "9001:9091" # web ui port
    TRANSMISSION_PEER_TCP: &port-tmp_t "51413:51413" # peer port
    TRANSMISSION_PEER_UDP: &port-tmp_u "51413:51413/udp" # peer port

    SONARR_WEBUI: &port-sonarr "9002:8989" # web ui port
    RADARR_WEBUI: &port-radarr "9003:7878" # web ui port
    PROWLERR_WEBUI: &port-prowlerr "9004:9696" # web ui port
    SOLVERR_WEBUI: &port-solverr "9005:8191" # web ui port
  vpn-env:
    &var-vpn
    OPENVPN_PROVIDER: PROTONVPN
    OPENVPN_CONFIG: # config name without '.ovpn'
    OPENVPN_USERNAME: # open vpns username
    OPENVPN_PASSWORD: # open vpns password
    # DISABLE_PORT_UPDATER: true # if you get errors with your vpn, you can try enabling this
  dns:
    DNS_MAIN: &dns_main 1.1.1.1 # cloudflare
    DNS_FALLBACK: &dns_fallback 8.8.8.8  # google

  env-vars:
    LOCAL_NETWORK: &var-localnet 192.168.1.0/24 #change this to your local ip (keep last 0)
    JELLYFIN_PublishedServerUrl: &var-jellyurl # http://example.com # public url
  other-vars:
    restart: &var-restart unless-stopped
  env-common:
    &common-env
    PUID: 1000
    PGID: 1000
    TZ: Etc/UTC # change to your time zone

# ---------------------------------------------------------------------------------------------
# Containers below
# ---------------------------------------------------------------------------------------------

services:
  jellyfin:
    image: lscr.io/linuxserver/jellyfin:latest
    container_name: servarr_jellyfin
    volumes:
      - ./data/jellyfin/config:/config
      - ./data/jellyfin/cache:/cache
      - *var-media
      # readonly folder
      # - type: bind
      #   source: /mnt/hdd0/media
      #   target: /media
      #   read_only: true
    restart: *var-restart
    environment:
      <<: *common-env
      JELLYFIN_PublishedServerUrl: *var-jellyurl
    ports:
      - *port-jellyfin-ui
      - *port-jellyfin-u1
      - *port-jellyfin-u2
    networks:
      - servarr_network

  transmission-openvpn:
    image: haugene/transmission-openvpn:latest
    container_name: servarr_transmission
    cap_add:
      - NET_ADMIN
    devices:
      - /dev/net/tun
    environment:
      <<: [*var-vpn, *common-env]
      LOCAL_NETWORK: *var-localnet
    volumes:
      - ./data/vpn/:/config/
      - *var-downloads
      - *var-media
    ports:
      - *port-tmw
      - *port-tmp_t
      - *port-tmp_u
    restart: *var-restart
    dns:
      - *dns_main
      - *dns_fallback
    networks:
      - servarr_network

  sonarr:
    image: lscr.io/linuxserver/sonarr:latest
    container_name: servarr_sonarr
    environment:
      <<: *common-env
    volumes:
      - ./data/sonarr:/config
      - *var-downloads
      - *var-media
    ports:
      - *port-sonarr
    restart: *var-restart
    networks:
      - servarr_network

  radarr:
    image: lscr.io/linuxserver/radarr:latest
    container_name: servarr_radarr
    environment:
      <<: *common-env
    volumes:
      - ./data/radarr:/config
      - *var-downloads
      - *var-media
    ports:
      - *port-radarr
    restart: *var-restart
    networks:
      - servarr_network

  prowlarr:
    image: lscr.io/linuxserver/prowlarr:latest
    container_name: servarr_prowlarr
    environment:
      <<: *common-env
    volumes:
      - ./data/prowlerr:/config
    ports:
      - *port-prowlerr
    restart: *var-restart
    networks:
      - servarr_network

  flaresolverr:
    # DockerHub mirror flaresolverr/flaresolverr:latest
    image: ghcr.io/flaresolverr/flaresolverr:latest
    container_name: servarr_flaresolverr
    environment:
      <<: *common-env
      LOG_LEVEL: ${LOG_LEVEL:-info}
      LOG_HTML: ${LOG_HTML:-false}
      CAPTCHA_SOLVER: ${CAPTCHA_SOLVER:-hcaptcha-solver}
    ports:
      - *port-solverr
    restart: *var-restart
    networks:
      - servarr_network

networks:
  servarr_network:
And that’s all for this article, thanks for reading and stay tuned for more tech insights and tutorials. Until next time, keep exploring the world of tech!