
0 - Introduction
Building a simple LED blink project is often the first step into the world of embedded systems and microcontroller programming. While many projects rely on the Arduino’s more user-friendly IDE and libraries, sometimes you want more, more speed or more control, and that’s when you should go lower, closer to the metal. Using ‘avr-gcc’ for compiling normal C code allows you to extract some extra speed (with good code of course), and sometimes that is all you need in a project.
That’s why we will learn, in this article, how to make the onboard led blink, using no Arduino libraries. The first step in ‘baremetal programming’.
If you don’t have an Arduino, you can buy one here.
1 - Setup
Before doing anything else, we need the dependencies and the compilers, we will install ‘build-essential’ for make and gcc, the ‘avr’ libraries for the compiler and symbols and we will use ‘avrdude’ to upload the code to the arduino:
sudo apt install avr-libc avrdude binutils-avr gcc-avr build-essentialThen we need a folder for our project, create a folder with the following structure:
project
├── main.c
└── Makefile
└── .vscode (only if you use vscode)
    └── c_cpp_properties.json
In the file inside the ‘.vscode’ folder, paste the following json as this file will help ‘IntelliSense’ know which libs and header files to include:
{
    "configurations": [
        {
            "name": "AVR",
            "includePath": [
                "${workspaceFolder}/**",
                "/usr/lib/avr/include"
            ],
            "defines": [
                "__AVR_ATmega328P__"
            ],
            "compilerPath": "/usr/bin/avr-gcc",
            "cStandard": "c11",
            "cppStandard": "gnu++11",
            "intelliSenseMode": "linux-gcc-x64"
        }
    ],
    "version": 4
}
1 - Code
To be able to compile the code and upload it to the Arduino you will have to use the following 3 commands:
- ‘avr-gcc’: compiles the code from c to bin file
- ‘avr-objcopy’: converts the bin file to a intel hex file (which avrdude expects)
- ‘avrdude’: copies the hex to the arduinos flash
avr-gcc -Os -DF_CPU=16000000UL -mmcu=atmega328p -o main.bin main.c
avr-objcopy -O ihex -R .eeprom main.bin main.hex
sudo avrdude -F -V -c arduino -p ATMEGA328P -P /dev/ttyUSB0 -b 115200 -U flash:w:main.hex
Now we can start to code the program. Start by including both ‘avr/io.h’ (gives you access to the registers and ports) and ‘util/delay’ (gives you a delay function).
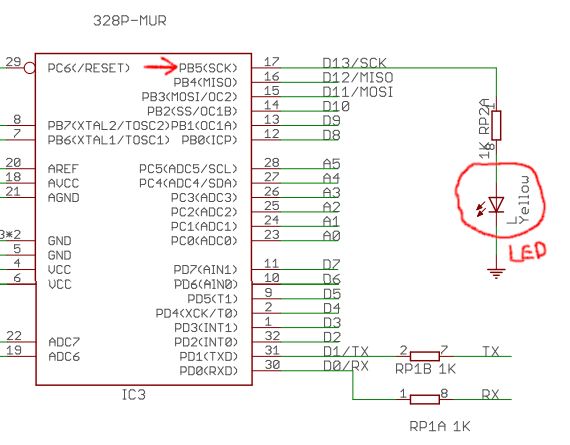
Then in the main function you first need to set pin D13 (the led) as output, we do that by ‘or-ing’ the ‘data direction register B’ in the position 5 . After that you need to make an infinite loop and in it is where you will turn the led on and off, you can do that with the ‘PORTB’ macro, to turn on the led you do the same you did to set the pin as output and, to turn it off, you ‘and’ the ‘PORTB’ with the inverse of one left-shifted 5 times.
You can find a document with the schematics for the Arduino Nano here. In this case we will be using the digital pin 13 which is pin 5 on the port B.
Below you can find all the code with some comments:
#include <avr/io.h>
#include <util/delay.h>

int main()
{
    // NanoV3.3_sch.pdf https://content.arduino.cc/assets/NanoV3.3_sch.pdf
    // LED is in D13 -> PB5
    // Set pin as output
    DDRB = DDRB | (1 << DDB5);

    while(1)
    {
        // Turn on LED
        PORTB = PORTB | (1 << DDB5);
        // Wait
        _delay_ms(500);
        // Turn off LED
        PORTB = PORTB & ~(1 << DDB5);
        // Wait
        _delay_ms(1000);
    }

    return 0;
}
In the following video i used Wokwi to emulate an arduino:
And that’s all, thanks for reading and stay tuned for more tech insights and tutorials. Until next time, keep exploring the world of tech!