0 - Introduction
In this article we will be making a small application with python to run an object detection model in your Raspberry Pi 5 using MediaPipe. If you get an error while creating your development environment it is possible that updating your system solves it.
Hardware needed:
sudo apt update
sudo apt upgrade
1 - Create Environment
This tutorial will be made in the Raspberry Pi, you can either use it directly or use ssh to connect to it with VSCode on your pc. Before we start, you need to have python’s ‘virtual-env’ installed, which we can install with:
sudo apt install python3-virtualenvNow we create a folder for our project and move into there:
mkdir ./mediapipe-test
cd ./mediapipe-test
In our project’s folder we will create a virtual environment where we will install our dependencies and execute our python programs:
# create virtual environment
virtualenv venv
# install mediapipe and dependencies
./venv/bin/pip install mediapipe opencv-python
Within our project folder we can now download google’s model to test our app and create all the other files:
wget -q -O efficientdet.tflite -q https://storage.googleapis.com/mediapipe-models/object_detector/efficientdet_lite0/int8/1/efficientdet_lite0.tflite- project
- venv (folder)
- efficientdet.tflite (downloaded)
- main.py
- run.shFirstly we will create our ‘run.sh’ file, it will be very simple. We start by echoing something to know the script is running (optional), then we set our display id (you can change it if needed, but 0 is usually the right one for the pi), and finally we open a terminal that runs our program. You can switch the last line to just execute your program directly, and instead of opening a window your program will be ran on the console you are using, in my case, i would see the program output in my laptop and not on the raspberry pi.
echo Starting...
export DISPLAY=:0

# this line opens a console to run the program
lxterminal -e "./venv/bin/python3 main.py; exec bash"
# this line runs the program in the current console
#./venv/bin/python3 main.py
If you get an error related to the numpy version you can fix it with these two lines:
# fix numpy version
./venv/bin/pip uninstall numpy -y
./venv/bin/pip install "numpy<2"
Now for the actual program, let’s start by seeing which includes we will use:
import cv2 # used to capture and render the camera
import time # used to calculate the fps
import mediapipe as mp # object detection
import numpy as np # gives data types

from mediapipe.tasks import python as mp_py
from mediapipe.tasks.python import vision as mp_vis
Next, we need some variables to keep track of the fps count and other states:
# Global variables to calculate FPS
COUNTER, FPS = 0, 0
START_TIME = time.time()
fps_avg_frame_count = 10

# Object detection result
DETECTION_RESULT = None
# Whether the obj detection is running or not
det_running = False
And with all these variables ready, let’s make the result callback, a function that is called when the object detector finishes detecting something. In this function we also calculate the fps:
def save_result(result: mp_vis.ObjectDetectorResult, unused_output_image: mp.Image, timestamp_ms: int):
        global FPS, COUNTER, START_TIME, DETECTION_RESULT, det_running

        # Calculate the FPS
        if COUNTER % fps_avg_frame_count == 0:
            FPS = fps_avg_frame_count / (time.time() - START_TIME)
            START_TIME = time.time()

        DETECTION_RESULT = result
        COUNTER += 1
        det_running = False
Next we will make a function that takes the image and the result of the object detector and draws a rectangle around the object:
def draw_box(image, det_res) -> np.ndarray:
    for det in det_res.detections:
        # Calculate and draw box around the detected object
        bbox = det.bounding_box
        startpoint = bbox.origin_x, bbox.origin_y
        endpoint = bbox.origin_x + bbox.width, bbox.origin_y + bbox.height
        cv2.rectangle(image, startpoint, endpoint, (0, 165, 255), 3)

        # Display label
        result_txt = det.categories[0].category_name + ' (' + str(round(det.categories[0].score, 2)) + ')'
        txt_loc = (bbox.origin_x + 10, bbox.origin_y + 40)
        cv2.putText(image, result_txt, txt_loc, cv2.FONT_HERSHEY_DUPLEX, 1, (0,0,0), 1, cv2.LINE_AA)

    return image
And now the ‘main’ part of the program, you might need to change the VideoCapture id, and you can change the model path and score_threshold to get better results:
# Start capture on device 0
cap = cv2.VideoCapture(0)

# create detector options
base_opt = mp_py.BaseOptions(model_asset_path="./efficientdet.tflite")
opt = mp_vis.ObjectDetectorOptions(
    base_options = base_opt, # required
    max_results = 20,  # can change
    running_mode = mp_vis.RunningMode.LIVE_STREAM, # required
    score_threshold = 0.3, # should change
    result_callback = save_result # can be changed to another function
)
# create detector
detector = mp_vis.ObjectDetector.create_from_options(opt)


# MAIN LOOP GOES HERE


# and before exiting the program we release the camera
cap.release()
# close any window that is still open
cv2.destroyAllWindows()
And, finally, we add the main loop. In here we will get the image from the camera, convert it, process it and display it:
while (cap.isOpened()):
# get frame
ret, frame = cap.read()
if not ret: # exit loop if we cant get a frame
print("Error with camera")
break
# Process
if not det_running:
# mark detector as running
det_running = True
# convert image to a format the detector expects
mp_image = mp.Image(image_format = mp.ImageFormat.SRGB, data = cv2.cvtColor(frame, cv2.COLOR_BGR2RGB))
# run detector
detector.detect_async(mp_image, time.time_ns() // 1_000_000)
# Show the FPS
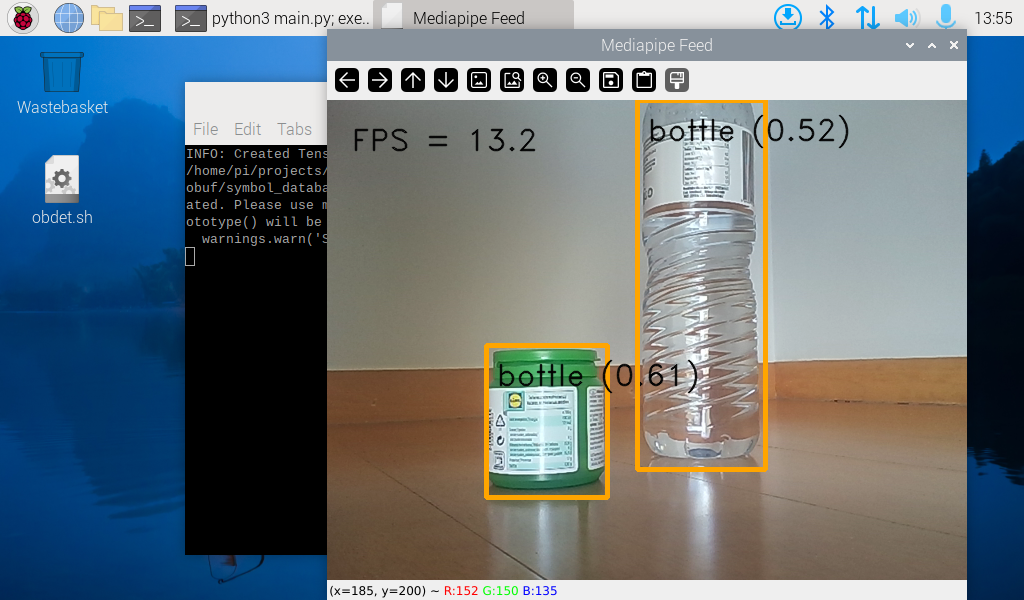
cv2.putText(frame, 'FPS = {:.1f}'.format(FPS), (24, 50), cv2.FONT_HERSHEY_DUPLEX, 1, (0,0,0), 1, cv2.LINE_AA)
# add boxes if result available
if DETECTION_RESULT:
frame = draw_box(frame, DETECTION_RESULT)
# render
cv2.imshow('Mediapipe Feed', frame)
# quit if 'q' is pressed
if (cv2.waitKey(1) & 0xFF == ord('q')):
break
And that’s it, with these steps you should be able to run this small program on your Raspberry Pi to detect objects.
If you are thinking of buying a Raspberry Pi for machine learning tasks, we recommend you buy the Raspberry Pi 5 we reviewed in a previous article.
Thanks for reading and stay tuned for more tech insights and tutorials. Until next time, keep exploring the world of tech!