
0 - Introduction
In this article, we will create a program for the Esp32 that connects to a Wi-Fi network and hosts web pages stored on an SD card. Many projects can benefit from having a custom web interface, and with this approach, your web pages are no longer constrained by kilobyte limits, they can now take advantage of storage in the megabyte range (biggest file i got working was a 2.5mb mp4 video).
The project is organized into three different classes (each with corresponding header and source files) and a main program file. We’ll walk through each component step by step, explaining the functionality of every key function along the way.
Before you begin, ensure you have an Esp32 (you can purchase one here), a SD Card reader (you can buy one here) and PlatformIO installed (you can follow installation instructions here).
Let’s start with the SD card class, create a ‘sdcard.h’ file. This class will store the CS pin of the card reader and a volatile bool variable that will be true if the SD card is being accessed.
For constructors, we have two. One that uses pin 4 as the default and one that let’s you choose which pin to use. Note that ‘m_inuse’ is initialized to false in both.
The most important functions, are begin and end, these functions run SD’s begin and end and also set the inuse flag. Besides those two functions we also have, one to print the contents of a folder to serial, one to read a whole file as text, one to read it as bytes, one to open a file in read mode and one to get the size of a file.
#ifndef _sdcard_h_
#define _sdcard_h_

#include <Arduino.h>
#include <SD.h>

/* @brief Class that manages the SD Card */
class tSDCard
{
    private:
    // cs pin
    gpio_num_t m_cs;
    // true if the card is being used
    volatile bool m_inuse;

    public:
    /* @brief Creates a new tSDCard. By default Pin 4 is used */
    tSDCard() : m_cs(GPIO_NUM_4), m_inuse(false) {}
    /* @brief Creates a new tSDCard
     * @param cs The CS pin to use */
    tSDCard(gpio_num_t cs) : m_cs(cs), m_inuse(false) {}

    /* @brief Get CS pin */
    gpio_num_t getCS();

    /* @brief Begins and ends the SD card, telling if it is working */
    bool available();
    /* @brief Begins the SD card, blocks until free to use
     * @warning Must call end() after using */
    bool begin();
    /* @brief Ends the use of the SD card */
    void end();

    /* @brief Prints the contents of a folder to the console */
    uint16_t printFolderContents(String path, bool autoBegEnd = true);
    /* @brief Read a file and store it's contents on the given buffer */
    uint16_t readAllText(char* out, uint16_t max, String path, bool autoBegEnd = true);
    /* @brief Read a file and store it's contents on the given buffer */
    uint16_t readAllBytes(uint8_t* out, uint16_t max, String path, bool autoBegEnd = true);

    /* @brief Open a file in read mode, must call close when done
     * @warning Must call begin() before using */
    File openRead(String path);
    /* @brief Returns the size of a file */
    size_t fileSize(String path, bool autoBegEnd = true);
};

#endif
Onto the cpp file, we will include the header file we just created, ‘SPI’ and ‘SD’. We will also create the ‘getCS’ function now, because it simply returns the value of ‘m_cs’:
#include "sdcard.h"
#include "SPI.h"
#include "SD.h"

gpio_num_t tSDCard::getCS() {return m_cs;}
The begin function is what we will call before we start accessing the SD card. This function has a loop at the start that waits until ‘m_inuse’ is false, to avoid the watchdog triggering, we add a delay of 20 milliseconds. You can also lower this value.
As soon as the SD card is not in use, we set it as in use and try to begin it using the pin stored in ‘m_cs’. If ‘SD.begin’ succeeds, return true, if it fails, we set ‘m_inuse’ as false and return false.
bool tSDCard::begin()
{
    while (m_inuse) // wait until the sd card is free
        vTaskDelay(20 / portTICK_PERIOD_MS); // you can make this delay smaller

    m_inuse = true; // sets the in-use flag
    if (SD.begin(m_cs, SPI, 4000000)) // try to start the sd card
        return true; // success

    m_inuse = false; // reset in-use flag
    return false; // error
}
The ‘end’ function simply runs ‘SD.end’ and resets the ‘m_inuse’ flag:
void tSDCard::end()
{
    SD.end(); // end sd card use
    m_inuse = false; // reset in-use flag
}
The ‘available’ function is not directly used in the other modules we will write, but I thought it was a ‘good to have’ in case someone needs it. This function tries to begin the SD card and checks it’s type, then ends it and returns the result.
bool tSDCard::available()
{
    bool hascard = true; // return value
    if (!begin() || SD.cardType() == CARD_NONE) // card does not exist?
        hascard = false;
    end(); // end sd card use
    return hascard;
}
The function ‘printFolderContents’ is a function that only exists to help with debugging. This function prints to Serial, the files and folder inside the given path, it is the equivalent of running ‘ls’ in your Ubuntu terminal (but less pretty).
This function supports auto beginning and ending, in case that is the only function you need to run. In it, we begin the SD card, if ‘autoBegEnd’ is set to true, then we open the given path and, with ‘dir.openNextFile’, we print all files and folders names to Serial. To add some utility to the function, there is also a variable that counts the ammount of files and folders. Finally, before returning the count, we also run ‘end’ if ‘autoBegEnd’ is set.
uint16_t tSDCard::printFolderContents(String path, bool autoBegEnd)
{
    if (autoBegEnd && !begin()) // if should auto begin, but failed
    {
        Serial.println("SD: Card not available.");
        return 0;
    }

    File dir = SD.open(path); // open folder
    if (!dir) // folder does not exist
    {
        Serial.println("SD: No folder");
        if (autoBegEnd)
            end();
        return 0;
    }
    uint16_t fcount = 0; // file folder count
    while (File file = dir.openNextFile()) // for all files and folders
    {
        Serial.println(file.name()); // print file folder name
        fcount++; // increase file folder count
    }

    if (autoBegEnd) // should auto end?
        end(); // end sd card use
    return fcount; // return file folder count
}
‘readAllText’ opens a file and copies the read string to the ‘out’ buffer. To avoid buffer overflows, we also pass a ‘max’ that holds that maximum ammount of characters that can be copied. This function also supports automatically beginning and ending.
uint16_t tSDCard::readAllText(char* out, uint16_t max, String path, bool autoBegEnd)
{
    if (autoBegEnd && !begin()) // if should auto begin, but failed
    {
        Serial.println("SD: Card not available.");
        return 0;
    }

    File f = SD.open(path); // open file
    if (!f || f.size() == 0) // file doesnt exist or is empty
    {
        Serial.println("SD: file empty or does not exist");
        if (autoBegEnd)
            end();
        return 0;
    }
    uint16_t len = 0; // read length
    int c = f.read(); // read first char
    while (c != '\0' && c != EOF && len < (max - 1)) // until null or end of file
    {
        out[len] = c; // save char
        len++; // increment len
        c = f.read(); // read next char
    }
    out[len] = '\0'; // make sure the string is null terminated

    if (autoBegEnd) // if should auto end
        end();

    return len;
}
The next function implemented is ‘readAllBytes’, this function is a copy of ‘readAllText’ but the buffer type is ‘uint8_t’ instead of ‘char’ and we also need to remove the check that stops the copy if you encounter a null character, because while reading binary data you, most likelely, want to read zeros.
uint16_t tSDCard::readAllBytes(uint8_t* out, uint16_t max, String path, bool autoBegEnd)
{
    if (autoBegEnd && !begin()) // if should auto begin, but failed
    {
        Serial.println("SD: Card not available");
        return 0;
    }

    File f = SD.open(path);
    if (!f || f.size() == 0) // file doesnt exist or is empty
    {
        Serial.println("SD: file empty or does not exist");
        if (autoBegEnd)
            end();
        return 0;
    }
    uint16_t len = 0;
    int c = f.read(); // read first byte
    while (c != EOF && len < max) // until end of file or buffer full
    {
        out[len] = c; // store char
        len++; // increase length
        c = f.read(); // read next
    }

    if (autoBegEnd) // if should auto end
        end();
    return len;
}
This function is a little smaller than the others and it’s only use is to return the handle to a file. Why not run ‘SD.open’ directly? Because if the file does not exist, ESP-IDF logs some errors to the console, and I wanted to avoid unecessary errors as much as possible.
File tSDCard::openRead(String path)
{
    if (!SD.exists(path)) // file does not exist?
        return File(nullptr); // return null handle
    return SD.open(path); // open file
}
This final function is only used for debugging purpuses, but you could also use it to set ‘Content-Length’ in HTTP responses. It simply opens a file and returns it’s size.
size_t tSDCard::fileSize(String path, bool autoBegEnd)
{
    if (autoBegEnd && !begin()) // if should auto begin, but failed
    {
        Serial.println("SD: Card not available");
        return 0;
    }

    if (!SD.exists(path)) // file does not exist?
    {
        if (autoBegEnd)
            end();
        return 0;
    }
    File f = SD.open(path); // open file
    if (!f) // null handle?
    {
        if (autoBegEnd)
            end();
        return 0;
    }
    size_t out = f.size(); // get size
    f.close(); // close file
    if (autoBegEnd)
        end();
    return out; // return size
}
With both the header and source files ready, we can now run some tests on main. The following main file tests all functions of our little class and, for it to work, you need in the root of the SD card, a binary file named ‘image.bin’ and a text file named ‘wifi.txt’. Why these names? I already had those files.
#include <Arduino.h>
#include "sdcard.h"
tSDCard sd(GPIO_NUM_4);
void printBuf(uint8_t* buf, size_t n)
{
if (n == 0)
return;
char cbuf[8];
for (size_t i = 0; i < n - 1; i++)
{
snprintf(cbuf, 7, "0x%02x, ", buf[i]);
Serial.print(cbuf);
}
snprintf(cbuf, 7, "0x%02x", buf[n - 1]);
Serial.print(cbuf);
}
void setup()
{
Serial.begin(115200);
if (!sd.available())
{
Serial.print("No SD Card Found!");
vTaskDelay(2000 / portTICK_PERIOD_MS);
ESP.restart();
return;
}
sd.begin();
// getCS
Serial.print("SD CS Pin: ");
Serial.println(sd.getCS());
Serial.println();
// printFolderContents
Serial.println("Contents of '/':");
sd.printFolderContents("/", false);
Serial.println();
// fileSize
Serial.print("Size of 'wifi.txt': ");
Serial.println(sd.fileSize("/wifi.txt", false));
Serial.println();
// readAllText
char buf[128];
sd.readAllText(buf, 128, "/wifi.txt", false);
Serial.println("Contents of 'wifi.txt':");
Serial.println(buf);
Serial.println();
// fileSize
Serial.print("Size of 'image.bin': ");
Serial.println(sd.fileSize("/image.bin", false));
Serial.println();
// readAllBytes
uint8_t bbuf[512];
uint16_t bcount = sd.readAllBytes(bbuf, 512, "/image.bin", false);
Serial.println("Contents of 'image.bin':");
printBuf(bbuf, bcount);
Serial.println();
sd.end();
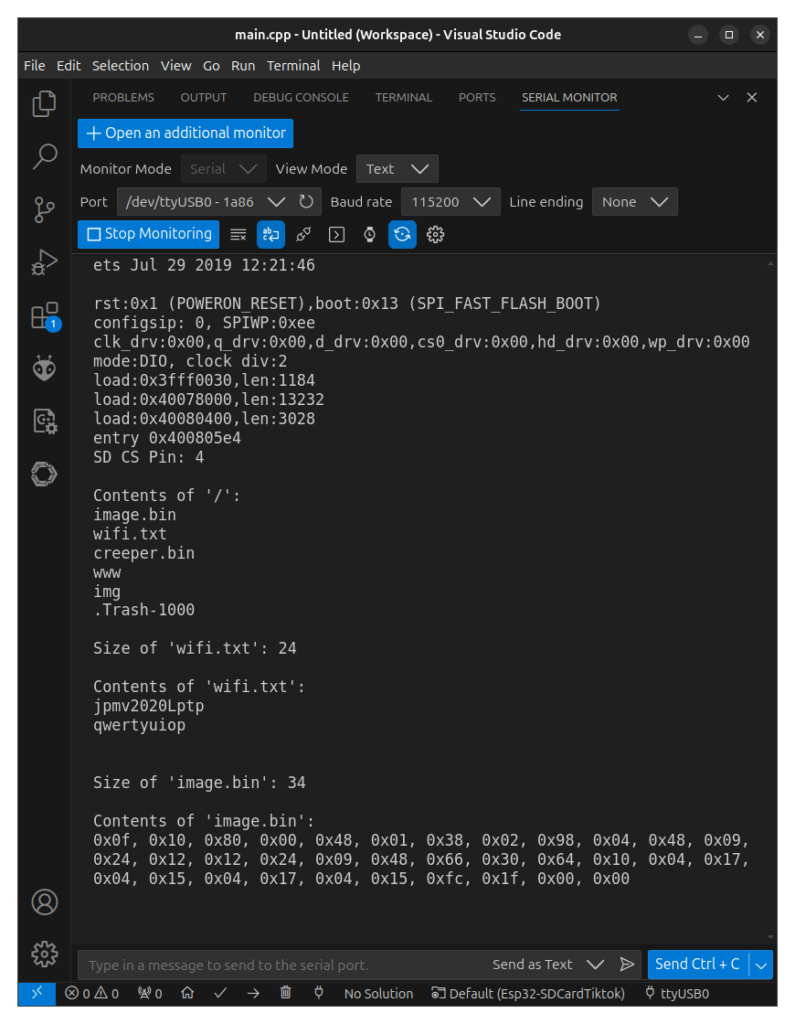
}After flashing the program to your Esp32, you should get an output similar to the one on this image.
If you get errors regarding the connection of the SD card, make sure your SPI cables are connected right and are as short as possible (to avoid interferance).
If you are concerned about IO speed, you have the right to be, because the SD card on the Esp32 using the SPI card reader I currently hav, it is all very slow compared to my linux machine.
Moving onto WiFi. This header file (‘wifi.h’) will have a class that will only contain one variable, named ‘m_ssid’ and it will hold the network name, in case it is needed. As for functions, we have the constructor, that initializes the ssid variable, ‘getSSID’ and ‘getIP’ which return the ssid and local ip respectively, ‘connected’ which returns true if WiFi is connected, ‘disconnect’, which disconnects WiFi and turns it off and then two ‘connect’ functions.
The first connect function will use the given ssid and password to connect to a network, and the second function will load a file named ‘wifi.txt’ from the SD card and get the credentials from it, then it will use the first function to connect to the network:
#ifndef _wifi_h_
#define _wifi_h_

#include <Arduino.h>
#include "sdcard.h"

/* @brief Class that manages the connection to WiFi
 * @todo Add Task to reconnect */
class tWiFi
{
    private:
    // Network name
    String m_ssid;

    public:
    /* @brief Creates a new tWiFi */
    tWiFi() : m_ssid("") {}

    /* @brief Connect to a network using the given credentials
     * @param ssid Network name
     * @param pass Network password
     * @returns Success */
    bool connect(const char* ssid, const char* pass);
    /* @brief Connect to a network using the credentials stored in 'wifi.txt'
     * @param sd SD Card handler
     * @returns Success */
    bool connect(tSDCard* sd);
    /* @brief Disconnect and turn off wifi */
    void disconnect();
    /* @brief Check if connected to a network
     * @returns True if connected */
    bool connected();

    /* @brief Get local ip
     * @returns Local IP address */
    IPAddress getIP();
    /* @brief Get ssid
     * @returns Network name */
    String getSSID();
};

#endif
On the cpp file, include both the wifi header we created and the one that comes with the Esp32, we will also need to use functions from the sd card and define a timeout for the connection attempts:
#include "wifi.h"
#include <WiFi.h>

#include "sdcard.h"

#define WIFI_TIMEOUT_MS 5000
The function that connects to a network is pretty simple. Start by setting the WiFi mode to station and then begin it with the ssid and password of the network you want to connect to, create a variable to keep track of the time elapsed and in a while loop, check if the connection was successfull, with an if statement, check if the time elapsed is higher than the timeout, and if it is, disconnect (passing true turns off the radio), also increment timeout and add a delay of 1ms in the loop. If the connection was successfull, save the ssid, log your ip and return true:
bool tWiFi::connect(const char* ssid, const char* pass)
{
    WiFi.mode(WIFI_STA); // set mode to station
    WiFi.begin(ssid, pass); // connect to the given network

    uint16_t timeout = 0;
    while (WiFi.status() != WL_CONNECTED) // while not connected
    {
        if (timeout > WIFI_TIMEOUT_MS) // check timeout
        {
            WiFi.disconnect(true); // disconnect
            Serial.println("WiFi: Connection failed");
            return false; // failed to connect
        }
        timeout++; // increase timeout counter
        vTaskDelay(1 / portTICK_PERIOD_MS); // wait 1ms
    }

    m_ssid = ssid; // save ssid
    Serial.println("WiFi: Connected to " + m_ssid + " (" + WiFi.localIP().toString() + ")");
    return true; // connected successfully
}
The ‘connect’ function that takes the sd card handler as an argument will read the text from the ‘wifi.txt’ at the root of your sd card, make a size check, split the string in two, check if there is atleast two lines in the file, and use line 1 as the ssid and line 2 as the password.
The ‘str_split’ function replaces all instances of c with ‘\0’ and returns a pointer to the character after the first character equal to c:
// Splits a string into two on the first appearence of the character in c. str1 = str, str2 = return
char* str_split(char* str, char c)
{
    uint16_t i = 0;
    char* out = NULL;
    while (str[i] != '\0') // until the string ends
    {
        if (str[i] == c) // if the curr char is c
        {
            if (out == NULL) // if out is still null
                out = (str + i + 1); // save the second string pointer
            str[i] = '\0'; // replace c with null char
        }
        i++; // increase index
    }
    return out != NULL ? out : str; // return pointer to second string
}

bool tWiFi::connect(tSDCard* sd)
{
    // 97 = 32 max ssid + new line char + 63 max password + '\0'
    char wtxt[97];
    // load wifi.txt
    uint16_t wtxtlen = sd->readAllText(wtxt, 97, "/wifi.txt");
    // min ssid = 0, new line = 1, min pass = 8
    if (wtxtlen < 9)
    {
        Serial.println("WiFi: non-existent or invalid wifi.txt");
        return false;
    }

    // Separate ssid from password
    char* ssid = wtxt;
    char* pass = str_split(wtxt, '\n');

    // Pass will be the same as ssid if there is only one line of text
    if (ssid == pass)
    {
        Serial.println("WiFi: invalid wifi.txt");
        return false;
    }

    // Connect
    return connect(ssid, pass);
}
And finally, the remaining functions:
bool tWiFi::connected() { return WiFi.status() == WL_CONNECTED; }

void tWiFi::disconnect() { WiFi.disconnect(true); }

IPAddress tWiFi::getIP() { return WiFi.localIP(); }

String tWiFi::getSSID() { return m_ssid; }
To test the WiFi, on main, you can run the following code. Just make sure you have your SD card reader is connected right and your SD card has a file named ‘wifi.h’ with the correct ssid and password in it:
#include <Arduino.h>
#include "sdcard.h"
#include "wifi.h"

tSDCard sd(GPIO_NUM_4);
tWiFi wifi;

void setup()
{
    Serial.begin(115200);

    if (!sd.available())
    {
        Serial.print("No SD Card Found!");
        vTaskDelay(2000 / portTICK_PERIOD_MS);
        ESP.restart();
        return;
    }

    wifi.connect(&sd);
}

void loop()
{
    if (!wifi.connected())
    {
        Serial.println("WiFi: Trying to reconnect");
        wifi.connect(&sd);
    }
    vTaskDelay(5000 / portTICK_PERIOD_MS);
}Now, with WiFi connectivity and access to the SD card, you are ready to host your own webserver. In it’s header file, we inlcude the ‘sdcard’ and ‘wifi’ files we created along with the server library. To add the library to your project, add the following line to your ‘platform.ini’ file:
lib_deps = mathieucarbou/ESPAsyncWebServer@^3.3.23The Web class will hold two private variables, one for the server and one for the sd card handle.
For functions, you will need a public constructor that takes in the sd handle and a init function. For private functions, you will need ‘sendError’, ‘handleFile’, ‘handleReq’, ‘handle404’ and ‘handleFavicon’:
#ifndef _web_h_
#define _web_h_

#include <Arduino.h>
#include <ESPAsyncWebServer.h>
#include "sdcard.h"
#include "wifi.h"

// Root folder for the webserver assets
#define WEB_ROOT "/www"

/* @brief Class that manages the Web Server */
class tWeb
{
    private:
    // Webserver
    AsyncWebServer m_server;
    // SD card handle
    tSDCard* m_sd;

    /* @brief Sends a reply with code 500 and a plain text message
     * @param req The request
     * @param msg The message to send */
    void sendError(AsyncWebServerRequest* req, String msg);

    /* @brief Load an send a file
     * @param req The request
     * @param msg The message to send
     * @param code The HTTP code the reply will have
     * @returns Success */
    bool handleFile(AsyncWebServerRequest* req, String path, int code = 200);
    void handleReq(AsyncWebServerRequest* req);
    /* @brief Sends the 404 page
     * @param req The request */
    void handle404(AsyncWebServerRequest* req);
    /* @brief Sends the favicon
     * @param req The request */
    void handleFavicon(AsyncWebServerRequest* req);

    public:
    /* @brief Creates a tWeb class
     * @param sd The SD card handle */
    tWeb(tSDCard* sd) : m_server(80), m_sd(sd) {}
    /* @brief Initializes and starts the server */
    void init();
};

#endif
On the cpp file, start by including the header file we just created and then, define the following strings:
#include "web.h"

#define WEB_INDEX "index.html"
#define WEB_404 "/404.html"
#define WEB_FAVICON "/favicon.ico"
#define WEB_MIME_PLAIN "text/plain"
Http responses need to contain a “MIME Type” and it differs depending on the type of file you want to reply with. The function below takes a path and a buffer, and writes to it the mime type. Copy the function below to your ‘web.cpp’ file and add the types you need that could be missing:
bool getMime(String path, char out[])
{
    String sout = "";
    if      (path.endsWith(".html")) sout = "text/html";
    else if (path.endsWith(".htm"))  sout = "text/html";
    else if (path.endsWith(".css"))  sout = "text/css";
    else if (path.endsWith(".xml"))  sout = "text/xml";
    else if (path.endsWith(".txt"))  sout = WEB_MIME_PLAIN;
    else if (path.endsWith(".js"))   sout = "application/javascript";
    else if (path.endsWith(".png"))  sout = "image/png";
    else if (path.endsWith(".jpg"))  sout = "image/jpeg";
    else if (path.endsWith(".jpeg")) sout = "image/jpeg";
    else if (path.endsWith(".gif"))  sout = "image/gif";
    else if (path.endsWith(".svg"))  sout = "image/svg+xml";
    else if (path.endsWith(".ico"))  sout = "image/x-icon";
    else if (path.endsWith(".zip"))  sout = "application/zip";
    else if (path.endsWith(".gz"))   sout = "application/gzip";
    else if (path.endsWith(".7z"))   sout = "application/x-7z-compressed";
    else if (path.endsWith(".pdf"))  sout = "application/pdf";
    else if (path.endsWith(".json")) sout = "application/json";
    else if (path.endsWith(".bin"))  sout = "application/octet-stream";
    else if (path.endsWith(".mid"))  sout = "audio/midi";
    else if (path.endsWith(".midi")) sout = "audio/midi";
    else if (path.endsWith(".mp3"))  sout = "audio/mpeg";
    else if (path.endsWith(".mp4"))  sout = "video/mp4";
    else if (path.endsWith(".mpeg")) sout = "video/mpeg";
    else if (path.endsWith(".ttf"))  sout = "font/ttf";

    // valid mime?
    if (sout != "")
    {
        strcpy(out, sout.c_str()); // copy to out
        return true;
    }
    return false;
}
The ‘sendError’ function, takes in the request and a message and replies to the request with the code 500, plain text and the given message:
void tWeb::sendError(AsyncWebServerRequest* req, String msg)
{
    req->send(500, WEB_MIME_PLAIN, msg);
}
The ‘handleFile’ function, takes in a path, if it is a folder, it grabs the ‘index.html’ file inside it and then sends it in chunks:
bool tWeb::handleFile(AsyncWebServerRequest* req, String path, int code)
{
    // can't begin sd card?
    if (!m_sd->begin())
        return false;

    // open file
    File f = m_sd->openRead(path);
    if (!f) // can't open file?
    {
        m_sd->end(); // end sd access
        return false;
    }
    // is f a directory ?
    if (f.isDirectory())
    {
        f.close(); // close directory
        path = path + ("/" WEB_INDEX); // update path
        f = m_sd->openRead(path); // open index.html inside folder
        if (!f) // file does not exist?
        {
            m_sd->end(); // end sd access
            return false;
        }
    }
    // buffer for mime type string
    char mime[32];
    if (!getMime(path, mime)) // invalid mime type?
    {
        //Serial.println("handleFile: invalid mime: " + String(mime));
        f.close(); // close file
        m_sd->end(); // end sd access
        return false;
    }
    // end card usage
    m_sd->end();

    // Create response (the function inside will run once per chunk until the whole file is sent)
    AsyncWebServerResponse* resp = req->beginChunkedResponse(mime, [&f, this, path](uint8_t* buf, size_t maxlen, size_t index) -> size_t
    {
        if (!m_sd->begin()) // Can't start card?
        {
            Serial.println("beginChunkedResponse: No SD");
            return 0;
        }
        File f = m_sd->openRead(path); // open file
        if (!f) // cant open file?
        {
            Serial.println("beginChunkedResponse: Failed to open file");
            m_sd->end(); // end sd card
            return 0;
        }
        if (!f.available()) // file unavailable?
        {
            Serial.println("beginChunkedResponse: File not available?");
            f.close(); // close file
            m_sd->end(); // end sd card
            return 0;
        }
        f.seek(index); // set read position to index
        size_t len = f.read(buf, maxlen); // read chunk
        f.close(); // close file
        m_sd->end(); // end sd access
        return len;
    });
    resp->setCode(code); // set response code

    req->send(resp); // send response
    return true;
}
void tWeb::handleReq(AsyncWebServerRequest* req)
{
    // not GET?
    if (!String("GET").equals(req->methodToString()))
    {
        // send error
        sendError(req, "Invalid method, only accepts GET.");
        return;
    }
    // get url
    String path = req->url();
    Serial.println("GET: " + path);
    // fix path
    if (path.endsWith("/"))
        path = (WEB_ROOT + path + WEB_INDEX);
    else path = (WEB_ROOT + path);
    // could not handle file?
    if (!handleFile(req, path))
        handle404(req); // handle 404
}
The ‘handle404’ function, runs ‘handleFile’ with the path to the 404 page with the 404 code and, if it fails, sends a plain text message with the code 404:
void tWeb::handle404(AsyncWebServerRequest* req)
{
    // can't find file 404.html?
    if (!handleFile(req, (WEB_ROOT WEB_404), 404))
        req->send(404, WEB_MIME_PLAIN, "Page not found"); // send in text
}
The function ‘handleFavicon’ gets the path to the image from a file named ‘favicon.txt’, if it does not exist, it tries to use ‘favicon.ico’:
void tWeb::handleFavicon(AsyncWebServerRequest* req)
{
    char favicon[128];

    if (m_sd->readAllText(favicon, 128, WEB_ROOT "/favicon.txt"))
    {
        String sfavicon(favicon); // Create ArduinoLib String from buffer
        sfavicon = WEB_ROOT + sfavicon;
        sfavicon.trim(); // Remove white spaces
        //Serial.println("handleFavicon: " + sfavicon);
        if (!handleFile(req, sfavicon)) // can't find path inside favicon.txt?
            handle404(req); // send not found
        return;
    }
    //Serial.println("handleFavicon: " WEB_FAVICON);
    if (!handleFile(req, (WEB_ROOT WEB_FAVICON))) // can't find favicon.ico?
        handle404(req); // send not found
}
Finally, the ‘init’ function will register the favicon path and run ‘handleFavicon’, and ‘onNotFound’ it will run our ‘handleReq’ function:
void tWeb::init()
{
    // When not registered, try to find webpages on sd card
    m_server.onNotFound([this](AsyncWebServerRequest* r){this->handleReq(r);});
    // Register getter for favicon.ico
    m_server.on(WEB_FAVICON, [this](AsyncWebServerRequest* r){this->handleFavicon(r);});
    // Begin server
    m_server.begin();
}Putting everything we done until now together, gives us this ‘main.cpp’ file:
#include <Arduino.h>
#include "sdcard.h"
#include "wifi.h"
#include "web.h"
tSDCard sd(GPIO_NUM_4);
tWiFi wifi;
tWeb web(&sd);
void setup()
{
Serial.begin(115200);
// Print the contents of the web root dir
sd.printFolderContents(WEB_ROOT);
// Try to connect to WiFi
while (!wifi.connect(&sd))
vTaskDelay(5000 / portTICK_PERIOD_MS);
// Init the web server
web.init();
Serial.println("Setup: Complete");
}
void loop()
{
// Check if wifi is connected
if (!wifi.connected())
{
Serial.println("WiFi: Trying to reconnect");
wifi.connect(&sd); // connect
}
// Delay
vTaskDelay(5000 / portTICK_PERIOD_MS);
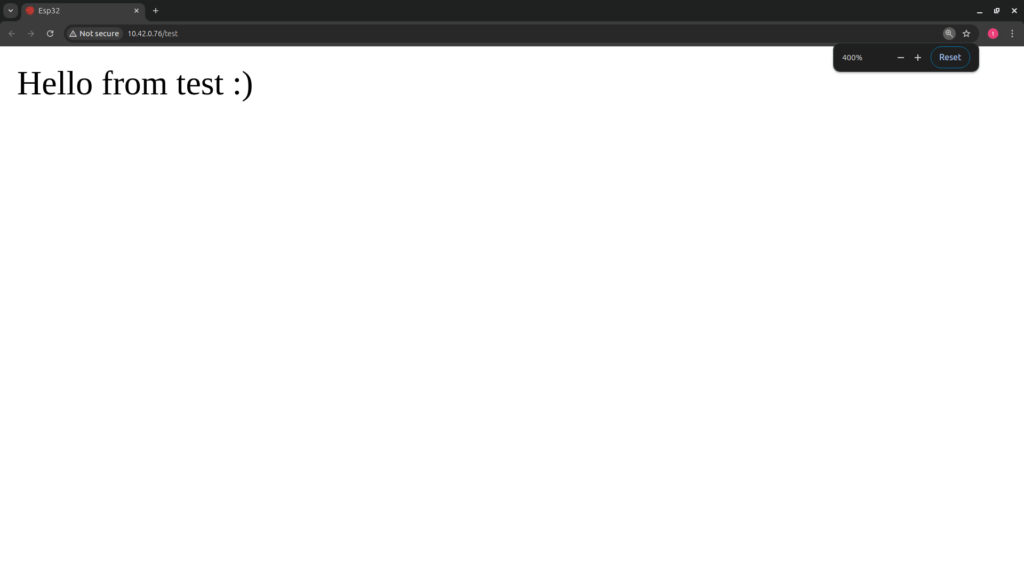
}You can test the web pages by creating the following structure in your sd card root:
/
├── "404.html"
├── "index.html"
├── "favicon.txt"
├── img
│   └── "espressif.svg"
├── test
│   └── "index.html"
└── hello
    └── "hello.html"
Here you have some test files:
<!-- 404.html -->
<html>
    <header>
        <title>Esp32</title>
    </header>
    <body>
        <p>Not found</p>
        <p><a href="/">Home</a></p>
    </body>
</html>
<!-- index.html -->
<html>
<header>
<title>Esp32</title>
</header>
<body>
<p>Hello :)</p>
</body>
</html>
<!-- test/index.html -->
<html>
    <header>
        <title>Esp32</title>
    </header>
    <body>
        <p>Hello from test :)</p>
    </body>
</html>
<!-- hello/index.html -->
<html>
    <header>
        <title>Esp32</title>
    </header>
    <body>
        <p>Hello from hello :)</p>
    </body>
</html>
Favicon.txt:
/img/espressif.svgimg/espressif.svg:
<svg xmlns="http://www.w3.org/2000/svg" fill="#e8362d" width="800px" height="800px" viewBox="0 0 24 24"><path d="M12.926 19.324a7.6 7.6 0 0 0-2.983-6.754 7.44 7.44 0 0 0-3.828-1.554.697.697 0 0 1-.606-.731.674.674 0 0 1 .743-.617 8.97 8.97 0 0 1 8 9.805 7.828 7.828 0 0 1-.298 1.542l1.989.56a11.039 11.039 0 0 0 1.714-.651 12.159 12.159 0 0 0 .217-2.343A12.57 12.57 0 0 0 7.212 6.171a5.53 5.53 0 0 0-2 0 4.354 4.354 0 0 0-2.16 1.337 4.274 4.274 0 0 0 1.909 6.856 9.896 9.896 0 0 0 1.074.195 4.011 4.011 0 0 1 3.337 3.954 3.965 3.965 0 0 1-.64 2.16l1.371.88a10.182 10.182 0 0 0 2.057.342 7.52 7.52 0 0 0 .754-2.628m.16 4.73A13.073 13.073 0 0 1 .001 10.983 12.982 12.982 0 0 1 3.83 1.737l.743.697a12.067 12.067 0 0 0 0 17.141 12.067 12.067 0 0 0 17.141 0l.697.697a12.97 12.97 0 0 1-9.336 3.726M24 10.993A10.993 10.993 0 0 0 12.949 0c-.389 0-.766 0-1.143.057l-.252.732a18.912 18.912 0 0 1 11.588 11.576l.731-.263c0-.366.069-.732.069-1.143m-1.269 5.165A17.53 17.53 0 0 0 7.818 1.27a11.119 11.119 0 0 0-2.457 1.77v1.635A13.919 13.919 0 0 1 19.268 18.57h1.634a11.713 11.713 0 0 0 1.771-2.446M7.92 17.884a1.691 1.691 0 1 1-1.69-1.691 1.691 1.691 0 0 1 1.69 1.691"></path></svg>
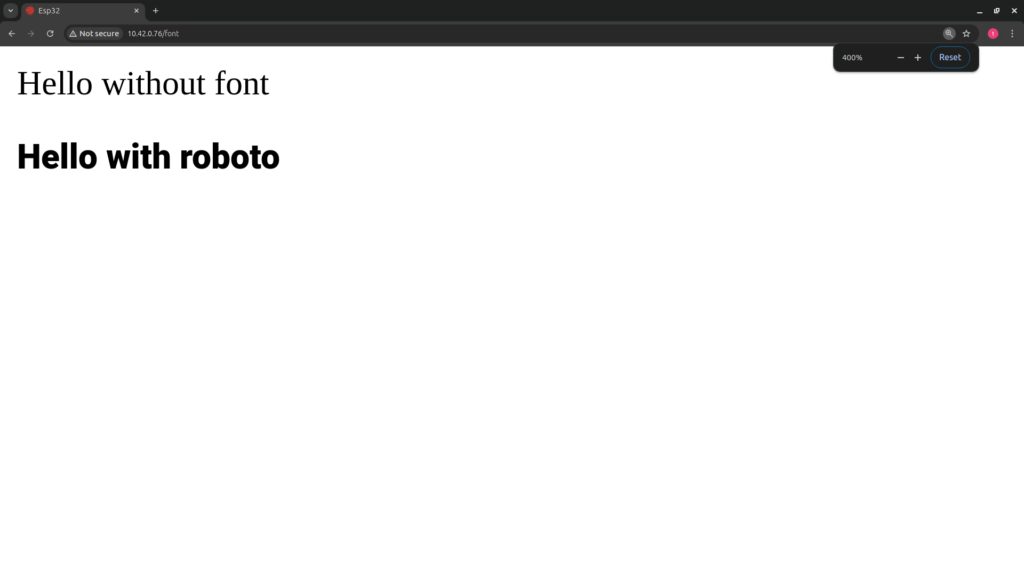
If you copy those files to the ‘www’ folder in your SD card, you should have everything ready. The following prints are some of the webpages I tested along with an example from w3schools:


And that’s it. A functioning server that can host more complex pages than the ones inside strings in source files.
Keep in mind that there is a chance that the esp crashes if you try to host a file that is too big, so test the code for yourself before adding it to your life critical project.
Thanks for reading and stay tuned for more tech insights and tutorials. Until next time, and keep exploring the world of tech!