0 - Introduction
A lot of projects require a way to save permanent data, or a large ammount of data, usually, a SD card is the best solution, as you can buy one for cheap. In this small project you will learn how to do basic file system operations, like read, write, create and delete files and folders. You will need:
- 1x Esp32
- 1x SD Card Reader
- 1x SD Card (32Gb or less, higher values can be harder to get working)
- 1x Breadboard (optional)
- At least 6 cables
Before you start, make sure you have Platform IO installed and with the Espressif 32 platform, you can learn how to install them in this article.

1 - Code
Start by creating a new project and deleting the example function. In this project we will need more than just the ‘Arduino’ include. We will need ‘Arduino’, ‘SD’, ‘FS’ and ‘SPI’. Let’s start with the includes and defines we need before the setup:
#include <Arduino.h>
#include <FS.h>
#include <SD.h>
#include <SPI.h>

#define SD_CS_PIN 2In this project we will need to convert bytes to megabytes and kilobytes, we can easely do that with the following functions:
double sizeInKBs(uint64_t bytes) { return (double)bytes / (1024.0); }
double sizeInMBs(uint64_t bytes) { return (double)bytes / (1024.0 * 1024.0); }
double sizeInGBs(uint64_t bytes) { return (double)bytes / (1024.0 * 1024.0 * 1024.0); }
For the functions that are related to folders, we won’t need to write anything, ‘SD’ already has them ready to use but, for consistency, i also made a wrapper for them.
Note: ‘sd_Rename’ works on files and folder!
int sd_Rename(fs::FS &fs, const char* from, const char* to) { return fs.rename(from, to); }
int sd_DeleteFile(fs::FS &fs, const char* path) { return fs.remove(path); }
int sd_CreateFolder(fs::FS &fs, const char* path) { return fs.mkdir(path); }
int sd_DeleteFolder(fs::FS &fs, const char* path) { return fs.rmdir(path); }
Listing the contents of a directory is a little harder though. In this example you can see how to print the contents of one on Serial:
First, we start by opening the folder, which can be a bit conter intuitive as the variable we use to represent a folder is called ‘File’ and we open them in the exact same way you would open a file. After that we get the files one by one using ‘dir.openNextFile()’ which can also return directories… So, before printing, we do a check on which if the ‘file’ is really a file or is actually a directory.
void sd_ListDir(fs::FS &fs, const char* dirname)
{
    Serial.printf("Listing directory: %s\n", dirname);

    File root = fs.open(dirname);
    if (!root)
    {
        Serial.println("Can't open directory");
        return;
    }
    if (!root.isDirectory())
    {
        Serial.println("Not a directory");
        return;
    }

    File file = root.openNextFile();
    while (file)
    {
        if (file.isDirectory())
        {
            Serial.print(" D: ");
            Serial.println(file.name());
        }
        else
        {
            Serial.print(" F: ");
            Serial.print(file.name());
            Serial.printf("  SIZE: %.2lfKBs\n", sizeInKBs(file.size()));
        }
        file = root.openNextFile();
    }
}
Writing files is pretty easy but requires some checks. We start by opening the file we want to write to (in this example, you can pass a bool to tell the function if it should overwrite the old file, or append at the end of it). After that, we need to check if the file was openened successfully, if it was, we can proceed with ‘printing’ or writing our text to the file, and finally, very important, we close the file.
int sd_WriteFile(fs::FS &fs, const char* path, const char* text, bool append = false)
{
    File file = append ? fs.open(path, FILE_APPEND) : fs.open(path, FILE_WRITE);
    if (!file)
        return 0;
    if (!file.print(text))
        return 0;
    file.close();
    return 1;
}Reading files can be made in a couple of different ways that depend on what your project needs to load from the file. In my case, i made a simple function that stores the contents of the file on a string (buffer), so that i can use it in other parts of the project.
int sd_ReadFile(fs::FS &fs, const char* path, char* out, int maxsize)
{
    File file = fs.open(path, "r");
    if (!file)
        return 0;
    int size = 0;
    while (file.available() && size < maxsize - 1)
    {
        out[size] = (char)file.read();
        size++;
    }
    out[size] = '\0';
    file.close();
    return size;
}
I also made a simple function that reads and writes to a file to test the speeds of reading and writing. The first run is, ususally, a little faster, so run the program 2 or 3 times to have a better ideia of the actual speeds you will be getting.
void sd_TestIO(fs::FS &fs, const char* path, int bufsize = 512, int writeops = 2048)
{
    Serial.println("Testing IO speeds...");
    uint32_t start = millis();
    File file = fs.open(path);
    if (!file)
    {
        Serial.println("sd_TestIO: Can't read test file");
        return;
    }
    uint8_t buf[bufsize] = { 'a' };
    size_t len = file.size(), flen = len;
    while (len)
    {
        size_t toRead = (len > bufsize) ? bufsize : len;
        file.read(buf, toRead);
        len -= toRead;
    }
    file.close();
    uint32_t end = millis() - start;
    Serial.printf("Read %u bytes in %ums\n", (uint32_t)flen, (uint32_t)end);

    start = millis();
    file = fs.open(path, FILE_WRITE);
    if (!file)
    {
        Serial.println("sd_TestIO: Can't write to test file");
        return;
    }
    for (int i = 0; i < writeops; i++)
        file.write(buf, bufsize);
    file.close();
    end = millis() - start;
    Serial.printf("Wrote %u bytes in %ums\n", (uint32_t)(writeops * bufsize), (uint32_t)end);
}
And, finally, we need to write the setup function, where we will initialize both Serial and the SD card:
void setup()
{
    Serial.begin(115200);
    vTaskDelay(5000 / portTICK_PERIOD_MS);

    Serial.println("Testing SD Card, do not eject!");

    // Restart Esp if can't init sd card
    if (!SD.begin(SD_CS_PIN))
    {
        // wait 2 seconds
        vTaskDelay(2000 / portTICK_PERIOD_MS);
        // restart
        ESP.restart();
        return;
    }

    // Print used space on SD
    Serial.printf("Used space: %.2lfMB/%.2lfGB\n", sizeInMBs(SD.usedBytes()), sizeInGBs(SD.totalBytes()));

    // + Dir
    Serial.println("Testing dir create:");
    if (!sd_CreateFolder(SD, "/test"))
        Serial.println("sd_CreateFolder: Error");
    else sd_ListDir(SD, "/");

    // > Dir
    Serial.println("Testing dir rename:");
    if (!sd_Rename(SD, "/test", "/testrename"))
        Serial.println("sd_Rename: Error");
    else sd_ListDir(SD, "/");

    // - Dir
    Serial.println("Testing dir delete:");
    if (!sd_DeleteFolder(SD, "/testrename"))
        Serial.println("sd_DeleteFolder: Error");
    else sd_ListDir(SD, "/");


    // + File
    Serial.println("Testing file write");
    if (!sd_WriteFile(SD, "/test.txt", "hello", false))
        Serial.println("sd_WriteFile: Can't overwrite file");
    Serial.println("Testing file append");
    if (!sd_WriteFile(SD, "/test.txt", "\nappended", true))
        Serial.println("sd_WriteFile: Can't append to file");
    sd_ListDir(SD, "/");

    // r File
    Serial.println("Testing file read");
    char buf[128];
    if (!sd_ReadFile(SD, "/test.txt", buf, 128))
        Serial.println("sd_ReadFile: Can't read file");
    else Serial.printf("Read: '%s'\n", buf);

    // w File
    Serial.println("Testing file overwrite");
    if (!sd_WriteFile(SD, "/test.txt", "goodbye", false))
        Serial.println("sd_WriteFile: Can't overwrite file");
    else if (sd_ReadFile(SD, "/test.txt", buf, 128))
        Serial.printf("Read after overwrite: '%s'\n", buf);

    // > File
    Serial.println("Testing file rename:");
    if (!sd_Rename(SD, "/test.txt", "/testrename.txt"))
        Serial.println("sd_Rename: Error");
    else sd_ListDir(SD, "/");

    // - File
    Serial.println("Testing file delete:");
    if (!sd_DeleteFile(SD, "/testrename.txt"))
        Serial.println("sd_DeleteFile: Error");
    else sd_ListDir(SD, "/");

    sd_TestIO(SD, "/testIO.txt");

    SD.end();

    Serial.println("Testing complete, SD Card can now be ejected!");
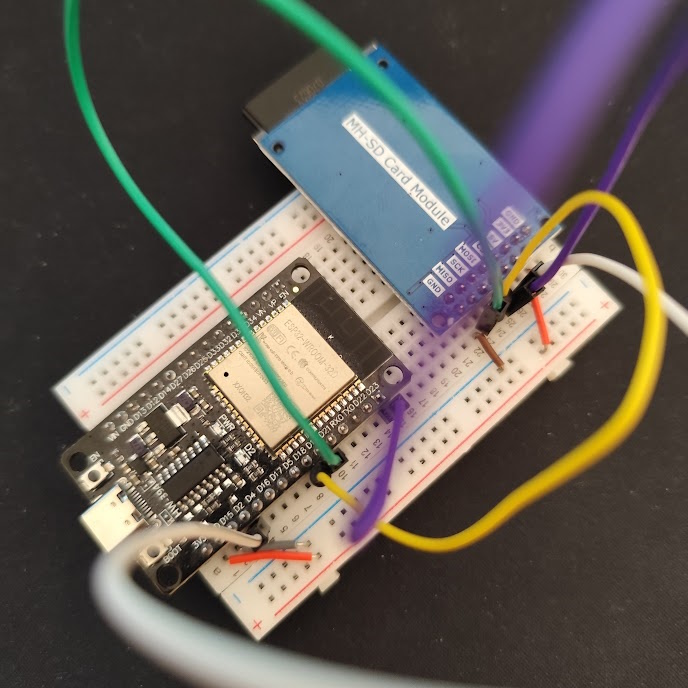
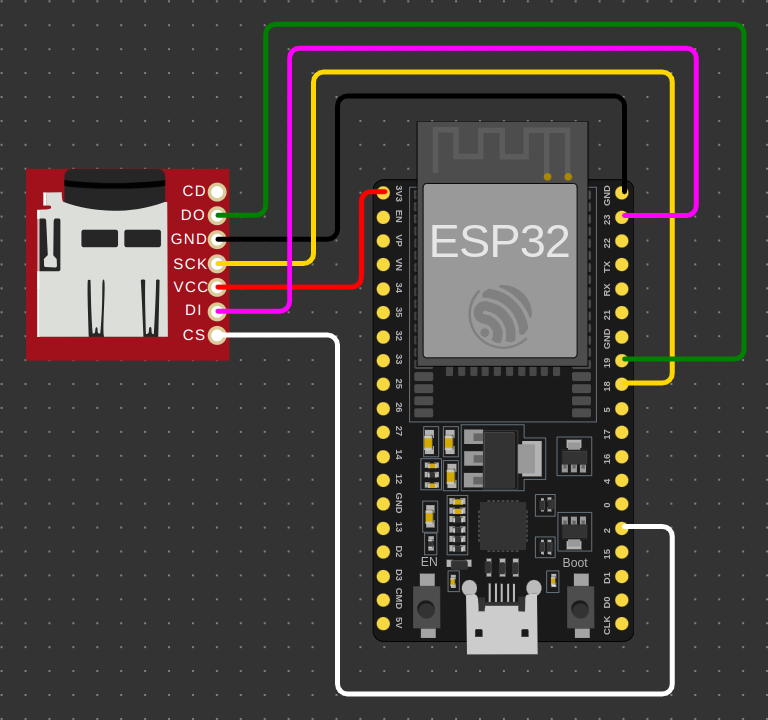
}Now you can finally assemble your circuit! Here is the diagram i made on Wokwi. Keep in mind that your card reader and your Esp could, and probably will, have pins in different places!
- CD is Card Detect, not all readers have it.
- DO is MISO on the Esp, usually pin 19.
- GND is ground.
- SCK is the serial clock, usually pin 18.
- VCC is 3.3v or, if your reader supports it, 5v
- DI is MOSI, usually pin 23.
- CS is Chip Select, it tells the slaves which chip should receive, or send data on the SPI bus.
Of all of these pins, only CS is easy to change. The other pins require a bit more effort to get working outside the esp defaults. You can learn your esps defaults usually on a datasheet given by the manufacturer. If you are using the same Esp as me, you can find a datasheet on our review.

Also, if you want to test your code before uploading it to your Esp, you can use Wokwi with the following diagram:
{
  "version": 1,
  "author": "TMVTech",
  "editor": "wokwi",
  "parts": [
    { "type": "board-esp32-devkit-c-v4", "id": "esp", "top": -19.2, "left": -119.96, "attrs": {} },
    { "type": "wokwi-microsd-card", "id": "sd1", "top": 0.23, "left": -259.13, "attrs": {} }
  ],
  "connections": [
    [ "esp:TX", "$serialMonitor:RX", "", [] ],
    [ "esp:RX", "$serialMonitor:TX", "", [] ],
    [ "sd1:VCC", "esp:3V3", "red", [ "h57.6", "v-38.26" ] ],
    [ "esp:GND.2", "sd1:GND", "black", [ "v-38.4", "h-115.2", "v57.49" ] ],
    [ "esp:2", "sd1:CS", "white", [ "h19.2", "v67.2", "h-134.4", "v-144.06" ] ],
    [ "esp:18", "sd1:SCK", "gold", [ "h19.2", "v-115.2", "h0", "v-9.6", "h-144", "v76.8" ] ],
    [ "esp:23", "sd1:DI", "magenta", [ "h28.8", "v-67.2", "h-163.2", "v105.6", "h9.6" ] ],
    [ "esp:19", "sd1:DO", "green", [ "h48", "v-134.4", "h-192", "v76.8" ] ]
  ],
  "dependencies": {}
}And that’s it! Everything you need to know about using SD cards with your future projects!
Thanks again, for reading. Stay tuned for more tech insights and tutorials. Until next time, and keep exploring the world of tech!
