
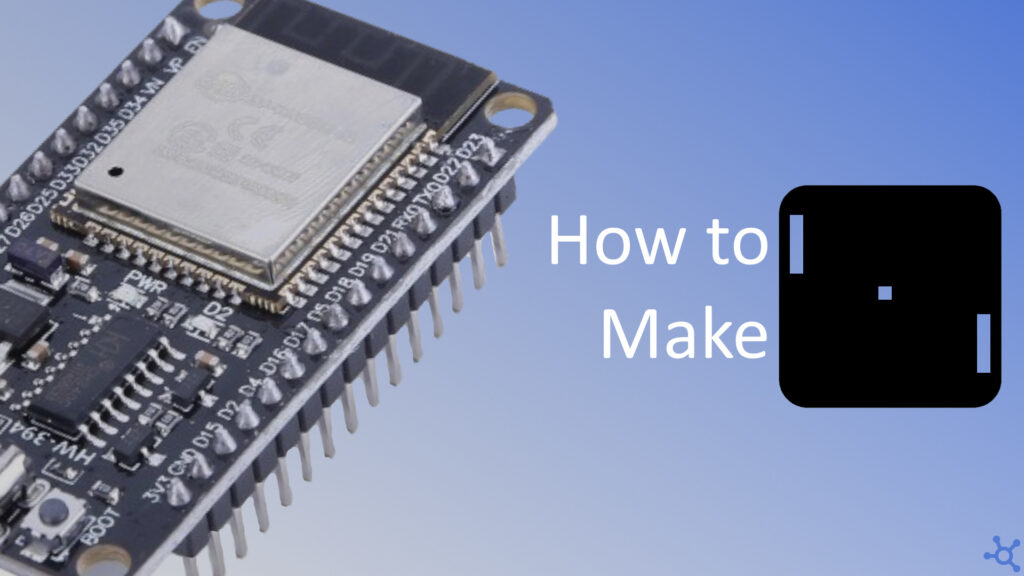
Since I learnt how to code, one of my dream projects is to make a game that runs anywhere, like me there are lots of people out there that would like to do the same, but making a game itself is already pretty complex, if we add the nuances of making multiplatform C++ code, it adds an extra level of complexity that a lot of people simply can’t handle at the start of their coding journeys.
In this article we will make a very simple Game Engine that let’s us easely make monochrome games for the Esp32 but also make it ready to port to Linux and even to an Arduino.
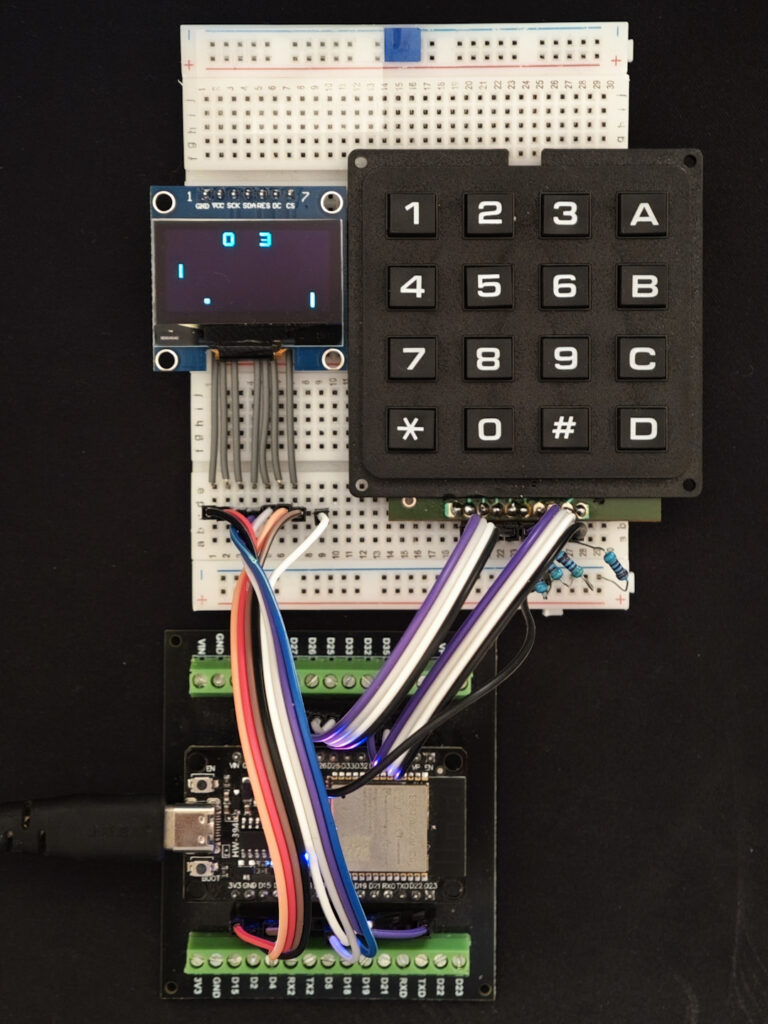
While making this project, I used the following hardware:
- 1x Esp32
- 1x 128×64 SPI Oled display
- 1x 8 pin 16 button keypad
- a couple of wires
For this project we will need some packages. ‘build-essential’ will install make which we will use to run the compilation and upload commands and ‘python3’ and ‘python3-venv’ which we will use to install and run PlatformIO:
sudo apt install build-essential python3 python3-venvBecause we will be using PlatformIO to compile and upload our code to the Esp32, we will need to create a file named ‘platformio.ini’, in this file we will set our platform, board, framework, dependencies, upload port and most importantly, the source file filter:
; PlatformIO Project Configuration File
;
;   Build options: build flags, source filter
;   Upload options: custom upload port, speed and extra flags
;   Library options: dependencies, extra library storages
;   Advanced options: extra scripting
;
; Please visit documentation for the other options and examples
; https://docs.platformio.org/page/projectconf.html

[env:nodemcu-32s]
platform = espressif32
board = nodemcu-32s
framework = arduino
lib_deps = u8g2
upload_port = /dev/ttyUSB0
build_src_filter = +<*> -<modules/*> +<modules/esp_*> -<linux_main.cpp> -<arduino_main.cpp>
After creating the .ini file, we will then create a Makefile, this file will let us compile and run our code on the Esp32 and on linux. If you check this file you should see some references for Arduino stuff, this will later be used to compile our code to the Arduino Mega.
# arduino mega
ARDUINO_PORT=/dev/ttyACM0
ARDUINO_BAUD=115200
ARDUINO_F_CPU=16000000UL
ARDUINO_MMCU=atmega2560
ARDUINO_PROGRAMMER_ID=wiring

# ====================================================================================================
# directories
DIR_SRC=src
DIR_OUT=out
OUT_NAME=program

# ====================================================================================================
# files
SOURCES := $(shell find $(DIR_SRC)/tengine -name '*.cpp') $(DIR_SRC)/pong.cpp
LINUX_SOURCES := $(shell find $(DIR_SRC)/modules -name 'linux_*.cpp') $(DIR_SRC)/linux_main.cpp
ARDUINO_SOURCES := $(shell find $(DIR_SRC)/modules -name 'arduino_*.cpp') $(DIR_SRC)/arduino_main.cpp

LINUX_OUT := $(DIR_OUT)/$(OUT_NAME)_linux
ARDUINO_ELF := $(DIR_OUT)/$(OUT_NAME)_arduino.elf
ARDUINO_HEX := $(DIR_OUT)/$(OUT_NAME)_arduino.hex

LINUX_OBJECTS := $(patsubst $(DIR_SRC)/%.cpp, $(DIR_OUT)/linux/%.o, $(SOURCES)) $(patsubst $(DIR_SRC)/%.cpp, $(DIR_OUT)/linux/%.o, $(LINUX_SOURCES))
ARDUINO_OBJECTS := $(patsubst $(DIR_SRC)/%.cpp, $(DIR_OUT)/arduino/%.o, $(SOURCES)) $(patsubst $(DIR_SRC)/%.cpp, $(DIR_OUT)/arduino/%.o, $(ARDUINO_SOURCES))

# ====================================================================================================
# compiler flags
LINUX_CC= gcc
LINUX_CC_FLAGS= -g -std=c++20 -Os -Wall -DLINUX -lSDL2 -lstdc++
LINUX_CC_HEADERS= -I/usr/include/SDL2

ARDUINO_CC= avr-gcc
ARDUINO_OCP= avr-objcopy
ARDUINO_UPL= sudo avr-dude
ARDUINO_CC_FLAGS= -Os -Wall -DF_CPU=$(ARDUINO_F_CPU) -mmcu=$(ARDUINO_MMCU)
ARDUINO_CC_HEADERS=

ESP_CC= .venv/bin/pio

# ====================================================================================================
# functions
.PHONY: linux.build, linux.run, arduino.build, arduino.upload, esp.build, esp.upload, setup, clean, clean.out, clean.pio, clean.all

# Compile app for linux
linux.build: $(LINUX_OUT)
	$()

# Run linux app
linux.run:
	chmod +x $(LINUX_OUT)
	$(LINUX_OUT)

# Compile for arduino
arduino.build: $(ARDUINO_HEX)
	$()

# Upload code to arduino
arduino.upload:
	$(ARDUINO_UPL) -V -c $(ARDUINO_PROGRAMMER_ID) -p $(ARDUINO_MMCU) -P $(ARDUINO_PORT) -b $(ARDUINO_BAUD) -D -U flash:w:$(ARDUINO_HEX):i

# Compile for esp32
esp.build:
	$(ESP_CC) run

# Upload code to esp32
esp.upload:
	$(ESP_CC) run --target upload

# Setup PlatformIO CLI
setup:
	python3 -m venv .venv
	.venv/bin/pip install platformio

# Remove out folder and run PIO clean if PIO is available
clean:
	rm -rf $(DIR_OUT)
	@if [ -f "$(ESP_CC)" ]; then      	\
		$(ESP_CC) run --target clean;   \
	fi

# Remove out folder
clean.out:
	rm -rf $(DIR_OUT)

# Run PIOs clean
clean.pio:
	@if [ -f "$(ESP_CC)" ]; then      	\
		$(ESP_CC) run --target clean;   \
	fi

# Remove pio and it's virtual environment
clean.all:
	rm -rf $(DIR_OUT) .pio .venv

# ====================================================================================================
# compile

#linux
$(DIR_OUT)/linux/%.o: $(DIR_SRC)/%.cpp
	mkdir -p $(dir $@)
	$(LINUX_CC) $(LINUX_CC_FLAGS) -c -o $@ $<

$(LINUX_OUT): $(LINUX_OBJECTS)
	$(LINUX_CC) -o $@ $(LINUX_OBJECTS) $(LINUX_CC_HEADERS) $(LINUX_CC_FLAGS)

# arduino
$(DIR_OUT)/arduino/%.o: $(DIR_SRC)/%.cpp
	mkdir -p $(dir $@)
	$(ARDUINO_CC) $(ARDUINO_CC_FLAGS) -c -o $@ $<

$(ARDUINO_ELF): $(ARDUINO_OBJECTS)
	$(ARDUINO_CC) $(ARDUINO_CC_FLAGS) -o $@ $(ARDUINO_OBJECTS)

$(ARDUINO_HEX): $(ARDUINO_ELF)
	$(ARDUINO_OCP) $(ARDUINO_ELF) -O ihex $(ARDUINO_HEX)
The way our Makefile and ‘platformio.ini’ files are setup, all files inside the ‘tengine’ folder will be included in the build and inside the modules folder only the platform specific files will be used, for example the Esp32 will include all files that start with ‘esp_’ and the linux build will include all files that start with ‘linux_’.
One key difference is that the Esp32 will include all files in the source directory automatically and, for Linux and Arduino, you will need to add them to the ‘SOURCES’ variables or, if it is platform specific, to ‘LINUX_SOURCES’ or ‘ARDUINO_SOURCES’.
SOURCES := $(shell find $(DIR_SRC)/tengine -name '*.cpp') $(DIR_SRC)/pong.cpp
LINUX_SOURCES := $(shell find $(DIR_SRC)/modules -name 'linux_*.cpp') $(DIR_SRC)/linux_main.cpp
ARDUINO_SOURCES := $(shell find $(DIR_SRC)/modules -name 'arduino_*.cpp') $(DIR_SRC)/arduino_main.cpp
Here you can see an example on how to add a file inside the source directory:
# From
SOURCES := $(shell find $(DIR_SRC)/tengine -name '*.cpp') $(DIR_SRC)/pong.cpp

# To
SOURCES := $(shell find $(DIR_SRC)/tengine -name '*.cpp') $(DIR_SRC)/pong.cpp $(DIR_SRC)/myfile.cpp
And, if you want to add a folder, you can do:
# From
SOURCES := $(shell find $(DIR_SRC)/tengine -name '*.cpp') $(DIR_SRC)/pong.cpp

# To
SOURCES := $(shell find $(DIR_SRC)/tengine -name '*.cpp') $(DIR_SRC)/pong.cpp $(shell find $(DIR_SRC)/myfolder -name '*.cpp')
Once again, if you want that file to only be added to Linux or to the Arduino, instead of adding it to the ‘SOURCES’ variable, add the file or folder to the ‘ARDUINO_SOURCES’ or the ‘LINUX_SOURCES’ variable.
With our environment setup and ready to be used, we will now start coding the engine files, those files will be placed inside the ‘tengine’ folder inside ‘src’ but, before proceeding,, make sure your environment looks something like this:
- src:
  - tengine:
    - # header and cpp files will be placed here
  - esp_main.cpp
- Makefile
- platformio.iniThe first thing our engine will need is a Math class, this class implements some functions that will be used in our game and also inside our engine:
#ifndef _tengine_math_h_
#define _tengine_math_h_

/* Math utility functions */
class TMath
{
    public:
    /* @brief if input is negative multiply by negative one and return
     * @param v input value
     * @return positive value */
    static float abs(float v);
    /* @brief calculates the inverse square root of a value
     * @param v input value
     * @return inverse square root of the value */
    static float isqrt(float v);
    /* @brief calculates the square root of a value
     * @param v input value
     * @return square root of the value */
    static float sqrt(float v);
    /* @brief Convert value from one scale to another (ex. from 0, 100 to -1, 1)
     * @param val Value to be converted
     * @param l0 Lowest value in the original scale
     * @param h0 Highest value in the original scale
     * @param l1 Lowest value in the new scale
     * @param h1 Highest value in the new scale */
    static float scale(float val, float l0, float h0, float l1, float h1);
    /* @brief Returns the absolute of the value with lowest absolute
     * @param a first value
     * @param b second value */
    static float minabs(float a, float b);
};

#endif
On the cpp of our Math class, we will implement the fast inverse square root from Quake III Arena, it will be inside an ‘extern C’ block, because some of the tricks used in that function can have unexpected results in C++, after that we implement the ‘abs’ function that always returns a positive value, then the ‘isqrt’ which call our ‘fastinvsqrt’ function, ‘sqrt’ which calculates the inverse of the inverse square root, ‘scale’ which takes a value in a scale and scales it to another scale and, finally, ‘minabs’ which always returns the value with the smallest absolute value:
#include "math.h"
#include <inttypes.h>

extern "C"
{
    // Calculation from Quake
    float fastinvsqrt(float v)
    {
        // create converter
        union { float f; uint32_t i; }
        conv = { .f = v };
        // calculate
        conv.i = 0x5f3759df - (conv.i >> 1);
        conv.f *= 1.5 - (v * 0.5 * conv.f * conv.f);
        return conv.f;
    }
}

float TMath::abs(float v) { return v < 0 ? -1.0 * v : v; }

float TMath::isqrt(float v) { return fastinvsqrt(v); }

float TMath::sqrt(float v) { return 1.0 / isqrt(v); }

float TMath::scale(float val, float l0, float h0, float l1, float h1)
{
    // clamp
    if (val < l0)
        val = l0;
    if (val > h0)
        val = h0;
    // calculate multipliers
    float s0 = h0 - l0;
    float s1 = h1 - l1;
    // prevent divide by 0
    if (s0 == 0 || s1 == 0)
        return l1;
    // return result
    return (((val - l0) * s1) / s0) + l1;
}

float TMath::minabs(float a, float b)
{
    a = abs(a);
    b = abs(b);
    return a < b ? a : b;
}As in all game engines, we will need a way to represent positions, rotations, directions and sizes and, from my experience, that way is usually called ‘Vector2’ in 2D space and ‘Vector3’ in 3D space. Because our game will be 2D, we will create a class named ‘Vec2’.
The first thing we define in this header file is a macro named ‘vec2_type’, this will let us change the data type used inside the ‘Vec2’ without changing the source file and after that we can declare our class.
The ‘Vec2’ class will only need two variables, an X and a Y. For constructors, we will have 3, one that takes no arguments and sets both X and Y to 0, one that takes one argument and sets both X and Y to the given value and a final one that takes and x and a y value and assings them to X and Y. After that we will have a length function that calculates the size of the vector and a normalize function that sets the length to 1 but keeps the direction the same, after that we will also have a lot of operator overrides and some constants to help us in calculations:
#ifndef _tengine_vec2_h_
#define _tengine_vec2_h_

#include <inttypes.h>

#ifndef vec2_type
/* Type used internaly by the Vec2 class */
#define vec2_type float
#endif

/* Class that stores an X and Y values, can be used as a point or a direction in 2D space */
class Vec2
{
    public:
    /* X component */
    vec2_type x;
    /* Y component */
    vec2_type y;

    Vec2();
    Vec2(vec2_type n);
    Vec2(vec2_type _x, vec2_type _y);

    /* Calculates the length of the vector */
    vec2_type length();
    /* Normalizes the vector (length = 1) */
    Vec2& normalize();

    Vec2 operator+(Vec2 const& obj);
    Vec2 operator-(Vec2 const& obj);
    Vec2 operator*(Vec2 const& obj);
    Vec2 operator*(vec2_type const& obj);
    Vec2 operator/(Vec2 const& obj);
    Vec2 operator/(vec2_type const& obj);
    bool operator==(Vec2 const& obj);
    Vec2& operator+=(Vec2 const& obj);
    Vec2& operator-=(Vec2 const& obj);
    Vec2& operator*=(Vec2 const& obj);
    Vec2& operator*=(vec2_type const& obj);
    Vec2& operator/=(Vec2 const& obj);
    Vec2& operator/=(vec2_type const& obj);

    const static Vec2 zero;  /* Vec2(0, 0) */
    const static Vec2 one;   /* Vec2(1, 1) */
    const static Vec2 up;    /* Vec2(0, -1) */
    const static Vec2 down;  /* Vec2(0, 1) */
    const static Vec2 left;  /* Vec2(-1, 0) */
    const static Vec2 right; /* Vec2(1, 0) */
};

#endif
Implementation of this class is very easy, we start by assigning the constants and creating the constructors.
The ‘length’ function will use the Pythagorean theorem to calculate the hypotenuse of the vector (it’s length) and with that function done, we can then create the ‘normalize’ function, that takes the length and divides both X and Y by it.
As for the operators, they are very simple, we either do ‘x * x’, ‘y * y’ or ‘x * n’ and ‘y * n’, changing the ‘*’ with the relevant operator:
#include "vec2.h"
#include "math.h"

const Vec2 Vec2::zero  = Vec2(0, 0);
const Vec2 Vec2::one   = Vec2(1, 1);
const Vec2 Vec2::up    = Vec2(0, -1);
const Vec2 Vec2::down  = Vec2(0, 1);
const Vec2 Vec2::left  = Vec2(-1, 0);
const Vec2 Vec2::right = Vec2(1, 0);

Vec2::Vec2() : x(0), y(0) {}
Vec2::Vec2(vec2_type n) : x(n), y(n) {}
Vec2::Vec2(vec2_type _x, vec2_type _y) : x(_x), y(_y) {}

vec2_type Vec2::length() { return TMath::sqrt(x * x + y * y); }

Vec2& Vec2::normalize()
{
    // calculate length
    vec2_type len = length();
    x /= len; // divide x by length
    y /= len; // divide y by length
    return *this;
}

Vec2 Vec2::operator+(Vec2 const& obj) { return Vec2(this->x + obj.x, this->y + obj.y); }
Vec2 Vec2::operator-(Vec2 const& obj) { return Vec2(this->x - obj.x, this->y - obj.y); }
Vec2 Vec2::operator*(Vec2 const& obj) { return Vec2(this->x * obj.x, this->y * obj.y); }
Vec2 Vec2::operator*(vec2_type const& obj) { return Vec2(this->x * obj, this->y * obj); }
Vec2 Vec2::operator/(Vec2 const& obj) { return Vec2(this->x / obj.x, this->y / obj.y); }
Vec2 Vec2::operator/(vec2_type const& obj) { return Vec2(this->x / obj, this->y / obj); }
bool Vec2::operator==(Vec2 const& obj) { return this->x == obj.x && this->y == obj.y; }

Vec2& Vec2::operator+=(Vec2 const& obj)
{
    this->x += obj.x;
    this->y += obj.y;
    return *this;
}
Vec2& Vec2::operator-=(Vec2 const& obj)
{
    this->x -= obj.x;
    this->y -= obj.y;
    return *this;
}
Vec2& Vec2::operator*=(Vec2 const& obj)
{
    this->x *= obj.x;
    this->y *= obj.y;
    return *this;
}
Vec2& Vec2::operator*=(vec2_type const& obj)
{
    this->x *= obj;
    this->y *= obj;
    return *this;
}
Vec2& Vec2::operator/=(Vec2 const& obj)
{
    this->x /= obj.x;
    this->y /= obj.y;
    return *this;
}
Vec2& Vec2::operator/=(vec2_type const& obj)
{
    this->x /= obj;
    this->y /= obj;
    return *this;
}The entity class will be the base of every game object we will create. This class will keep track of the position, direction (how much to move in the next frame), size and the sprite. It will have two constructors, one that takes in nothing and initializes everything to zero and another that initializes all parameters.
As for the functions it will only need two, one static, that checks if two entities collide and a non-static version of it, that checks if this entity collides with another one:
#ifndef _tengine_entity_h_
#define _tengine_entity_h_

#include "vec2.h"

class Entity
{
    public:
    Vec2 pos; /* Entity position in 2D space */
    Vec2 dir; /* Entity direction */
    Vec2 size; /* Entity size (used as hitbox and for sprite loading) */
    uint8_t* sprite; /* Pointer to sprite used to render this entity */

    Entity() : pos(Vec2::zero), dir(Vec2::zero), size(Vec2::one), sprite(nullptr) {}
    Entity(Vec2 p, Vec2 d, Vec2 s, uint8_t* spr = nullptr) : pos(p), dir(d), size(s), sprite(spr) {}

    /* Check if this entity collides with another one */
    bool col(Entity& b);
    /* Check if two entities collide */
    static bool col(Entity& a, Entity& b);
};

#endif
On the implementation, the non-static version simply calls the static one with a reference to itself and the other entity, and the static version calculates the collision between two rectangles (using the position and size):
#include "entity.h"

bool Entity::col(Entity& b) { return col(*this, b); }

bool Entity::col(Entity& a, Entity& b)
{
    if (a.pos.x > (b.pos.x + b.size.x)) // b a
        return false;                   //

    if ((a.pos.x + a.size.x) < b.pos.x) // a b
        return false;                   //

    if (a.pos.y > (b.pos.y + b.size.y)) // b
        return false;                   // a

    if ((a.pos.y + a.size.y) < b.pos.y) // a
        return false;                   // b

    return true; // a is colliding with b
}Now that we have the base for our engine we need to create the interfaces that the platform modules will implement. These are classes with virtual methods and no implementation, acting almost like a guide on what the inheriting class will need to implement.
These interface files will also be placed inside the ‘tengine’ folder.
The first interface will be ‘TTime’. This interface will let us get the current time since the game started and also make the game wait for a given ammount of time. On the Esp32, for example, we will use ‘millis’, ‘micros’ and ‘vTaskDelay’:
#ifndef _tengine_time_h_
#define _tengine_time_h_

#include <inttypes.h>

class TTime
{
    public:
    /* @brief Gets ammount of microseconds since the start of the program */
    virtual uint64_t micros() = 0;
    /* @brief Gets ammount of milliseconds since the start of the program */
    virtual uint64_t millis() = 0;

    /* @brief Waits/Sleeps for the given ammount of ms */
    virtual void waitms(uint64_t ms) = 0;
    /* @brief Waits/Sleeps for the given ammount of us */
    virtual void waitmicro(uint64_t us) = 0;
};

#endif
The next step is going to be the ‘TKeyboard’ class, this one will have a method to update the state of the keys and then methods to get the current state, if it was pressed this frame and if it was released this frame:
#ifndef _tengine_keyboard_h_
#define _tengine_keyboard_h_

#include <inttypes.h>

#define TKEYBOARD_KEYCOUNT 16

class TKeyboard
{
    public:
    /* @brief Updates the state of the keyboard */
    virtual void update() = 0;
    /* @brief True if key is currently being pressed */
    virtual bool getKey(uint8_t k) = 0;
    /* @brief True if key was pressed this tick */
    virtual bool getKeyDown(uint8_t k) = 0;
    /* @brief True if key was released this tick */
    virtual bool getKeyUp(uint8_t k) = 0;
};

#endif
Finally, the ‘TDisplay’ class will contain 3 functions, one that draws a list of entities on the screen, one that draws a pixel and one that fills the screen with a given color:
#ifndef _tengine_display_h_
#define _tengine_display_h_

#include "entity.h"
#include "itime.h"

class TDisplay
{
    public:
    /* @brief Draws all entities onto the display buffer
     * @param entities Entities to draw
     * @param entityCount Size of the entities array */
    virtual void draw(Entity* entities[], uint8_t entityCount) = 0;

    /* @brief Draws a pixel onto the buffer
     * @param x X Position of the pixel to draw
     * @param y Y Position of the pixel to draw
     * @param color True will paint white and false will paint black */
    virtual void drawPixel(uint8_t x, uint8_t y, bool color = true) = 0;

    /* @brief Fills the screen */
    virtual void fill(bool white, bool updatedisplay) = 0;
};

#endif
Now that we have our engine the next step is to make the platform specific code required to run games. The next files we are going to create will go inside the modules folder and will all have a name that starts with ‘esp_’, that tells the compiler to add these files to be compiled.
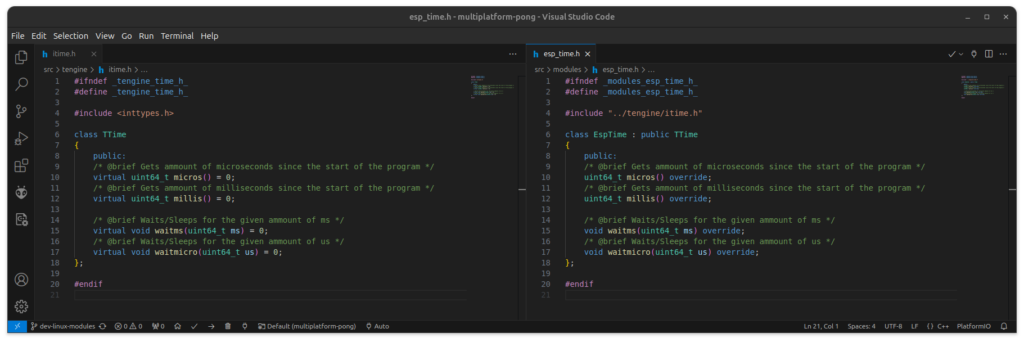
The first module we will code is the time module, create a folder named modules and in it create the file ‘esp_time.h’. This file is basically a copy of the time interface because we only need to override functions in the base class.
#ifndef _modules_esp_time_h_
#define _modules_esp_time_h_

#include "../tengine/itime.h"

class EspTime : public TTime
{
    public:
    /* @brief Gets ammount of microseconds since the start of the program */
    uint64_t micros() override;
    /* @brief Gets ammount of milliseconds since the start of the program */
    uint64_t millis() override;

    /* @brief Waits/Sleeps for the given ammount of ms */
    void waitms(uint64_t ms) override;
    /* @brief Waits/Sleeps for the given ammount of us */
    void waitmicro(uint64_t us) override;
};

#endif
On the cpp file we create two functions one named ‘arduinomicros’ and another named ‘arduinomillis’ these functions will call ‘micros’ and ‘millis’ from the Arduino library. The reason we can’t do that directly in our classes ‘micros’ and ‘millis’ functions is because they would call themselves. Finally for our wait functions we use ‘vTaskDelay’ from FreeRTOS and ‘portTICK_PERIOD_MS’:
#include "esp_time.h"
#include <Arduino.h>

inline uint32_t arduinomicros() { return micros(); }
inline uint32_t arduinomillis() { return millis(); }

uint64_t EspTime::micros() { return arduinomicros(); }
uint64_t EspTime::millis() { return arduinomillis(); }

void EspTime::waitms(uint64_t ms) { vTaskDelay(ms / portTICK_PERIOD_MS); }
void EspTime::waitmicro(uint64_t us) { vTaskDelay(us / portTICK_PERIOD_MS / 1000); }
To test our code, on the ‘esp_main.cpp’ file, copy the following test:
#include <Arduino.h>
#include <U8g2lib.h>

#include "modules/esp_time.h"

EspTime esptime;

void setup()
{
    Serial.begin(115200);
}

void loop()
{
    Serial.println(esptime.millis());
    esptime.waitms(1000);
    Serial.println(esptime.millis());

    Serial.println(esptime.micros());
    esptime.waitmicro(1000);
    Serial.println(esptime.micros());

    delay(5000);
}
Now compile and upload the code. Using an extension like ‘Serial Monitor’ on VSCode or the serial monitor on the Arduino IDE, check if the buttons are working and mapped to the correct places. If you see inverted keys, you can try flipping the wires to the keypad.
make esp.build
make esp.uploadLike on the previous module, we override the functions on the interface but, on this one, we will also create some arrays, one array for the keyboard pins, and two bool arrays for the key state and the previous key state. Besides the arrays we also add a debug function to help us test the keyboard.
#ifndef _modules_esp_keyboard_h_
#define _modules_esp_keyboard_h_

#include "../tengine/ikeyboard.h"
#include <inttypes.h>
#include <Arduino.h>

#define ESPKEYBOARD_PINCOUNT 8

class EspKeyboard: public TKeyboard
{
    gpio_num_t pins[ESPKEYBOARD_PINCOUNT];
    bool keys_last[TKEYBOARD_KEYCOUNT];
    bool keys[TKEYBOARD_KEYCOUNT];

    public:
    EspKeyboard(gpio_num_t _pins[ESPKEYBOARD_PINCOUNT]);

    /* @brief Updates the state of the keyboard */
    void update() override;
    /* @brief True if key is currently being pressed */
    bool getKey(uint8_t k) override;
    /* @brief True if key was pressed this tick */
    bool getKeyDown(uint8_t k) override;
    /* @brief True if key was released this tick */
    bool getKeyUp(uint8_t k) override;

    void debug_print();
};

#endif
On the cpp file we will use code similar to what we did in this article. The functions ‘getKeyDown’ and ‘getKeyUp’ simply check the current state of the key and the previous state to see if the key was pressed or released just now.
#include "esp_keyboard.h"

EspKeyboard::EspKeyboard(gpio_num_t _pins[ESPKEYBOARD_PINCOUNT])
{
    for (uint8_t i = 0; i < ESPKEYBOARD_PINCOUNT; i++)
    {
        pins[i] = _pins[i];
        if (i < ESPKEYBOARD_PINCOUNT / 2)
            pinMode(_pins[i], OUTPUT);
        else
            pinMode(_pins[i], INPUT_PULLDOWN);
    }
}

void EspKeyboard::update()
{
    for (uint8_t i = 0; i < TKEYBOARD_KEYCOUNT; i++)
        keys_last[i] = keys[i];

    digitalWrite(pins[0], HIGH);
    keys[0x1] = digitalRead(pins[4]);
    keys[0x4] = digitalRead(pins[5]);
    keys[0x7] = digitalRead(pins[6]);
    keys[0xE] = digitalRead(pins[7]);
    digitalWrite(pins[0], LOW);

    digitalWrite(pins[1], HIGH);
    keys[0x2] = digitalRead(pins[4]);
    keys[0x5] = digitalRead(pins[5]);
    keys[0x8] = digitalRead(pins[6]);
    keys[0x0] = digitalRead(pins[7]);
    digitalWrite(pins[1], LOW);

    digitalWrite(pins[2], HIGH);
    keys[0x3] = digitalRead(pins[4]);
    keys[0x6] = digitalRead(pins[5]);
    keys[0x9] = digitalRead(pins[6]);
    keys[0xF] = digitalRead(pins[7]);
    digitalWrite(pins[2], LOW);

    digitalWrite(pins[3], HIGH);
    keys[0xA] = digitalRead(pins[4]);
    keys[0xB] = digitalRead(pins[5]);
    keys[0xC] = digitalRead(pins[6]);
    keys[0xD] = digitalRead(pins[7]);
    digitalWrite(pins[3], LOW);
}

bool EspKeyboard::getKey(uint8_t k) { return (k < TKEYBOARD_KEYCOUNT && keys[k]); }
bool EspKeyboard::getKeyDown(uint8_t k) { return (k < TKEYBOARD_KEYCOUNT && keys[k] && !keys_last[k]); }
bool EspKeyboard::getKeyUp(uint8_t k) { return (k < TKEYBOARD_KEYCOUNT && !keys[k] && keys_last[k]); }

void EspKeyboard::debug_print()
{
    Serial.printf("%u %u %u %u\n%u %u %u %u\n%u %u %u %u\n%u %u %u %u\n\n",
        keys[0x1], keys[0x2], keys[0x3], keys[0xA],
        keys[0x4], keys[0x5], keys[0x6], keys[0xB],
        keys[0x7], keys[0x8], keys[0x9], keys[0xC],
        keys[0xE], keys[0x0], keys[0xF], keys[0xD]);
}
To test our module, copy the following code and, with the help of a serial monitor, check if the keys are all working correctly:
#include <Arduino.h>
#include <U8g2lib.h>

#include "modules/esp_time.h"
#include "modules/esp_keyboard.h"

EspTime esptime;
gpio_num_t keypins[] = { GPIO_NUM_27, GPIO_NUM_26, GPIO_NUM_25, GPIO_NUM_33, GPIO_NUM_35, GPIO_NUM_34, GPIO_NUM_39, GPIO_NUM_36 };
EspKeyboard espkeyboard(keypins);

void setup()
{
    Serial.begin(115200);
}

void loop()
{
    espkeyboard.update();
    espkeyboard.debug_print();
    esptime.waitms(1000);
}On the display module we will need a reference (or pointer) to the display’s handle, besides that is all just overriding functions:
#ifndef _modules_esp_display_h_
#define _modules_esp_display_h_

#include "../tengine/idisplay.h"
#include <U8g2lib.h>

class EspDisplay: public TDisplay
{
    U8G2* display;

    public:
    EspDisplay(U8G2* disp) : display(disp) {}
    /* @brief Draws all entities onto the display buffer
     * @param entities Entities to draw
     * @param entityCount Size of the entities array */
    void draw(Entity* entities[], uint8_t entityCount) override;

    /* @brief Draws a pixel onto the buffer
     * @param x X Position of the pixel to draw
     * @param y Y Position of the pixel to draw
     * @param color True will paint white and false will paint black */
    void drawPixel(uint8_t x, uint8_t y, bool color = true) override;

    /* @brief Fills the screen */
    void fill(bool white, bool updatedisplay) override;
};

#endif
On the cpp file, on the draw function, we loop for every entity and either draw it’s sprite, or a box in it’s location with it’s size. The draw pixel function, sets the color (white or black) and paints the pixel on the given location. Finally, the fill function, either clears the buffer or fills it with white and then, if true, also updates the display instantly:
#include "esp_display.h"

void EspDisplay::draw(Entity* entities[], uint8_t entityCount)
{
    display->setColorIndex(1);
    for (uint8_t i = 0; i < entityCount; i++)
    {
        Entity* ent = entities[i];
        if (ent->sprite != nullptr)
            display->drawXBM(ent->pos.x, ent->pos.y, ent->size.x, ent->size.y, ent->sprite);
        else
            display->drawBox(ent->pos.x, ent->pos.y, ent->size.x, ent->size.y);
    }
}

void EspDisplay::drawPixel(uint8_t x, uint8_t y, bool color)
{
    if (color)
        display->setColorIndex(1);
    else
        display->setColorIndex(0);
    display->drawPixel(x, y);
}

void EspDisplay::fill(bool white, bool updatedisplay)
{
    if (white)
    {
        uint8_t* buf = display->getBufferPtr();
        for (int i = 0; i < 1024; i++)
            buf[i] = 0xFF;
        return;
    }
    else
        display->clearBuffer();
    if (updatedisplay)
        display->sendBuffer();
}
To test the display, you can copy the following code, which renders some entities, renders a pixel and also let’s it move on the screen:
#include <Arduino.h>
#include <U8g2lib.h>

#include "modules/esp_time.h"
#include "modules/esp_keyboard.h"
#include "modules/esp_display.h"

EspTime esptime;
gpio_num_t keypins[] = { GPIO_NUM_27, GPIO_NUM_26, GPIO_NUM_25, GPIO_NUM_33, GPIO_NUM_35, GPIO_NUM_34, GPIO_NUM_39, GPIO_NUM_36 };
EspKeyboard espkeyboard(keypins);
U8G2_SH1106_128X64_NONAME_F_4W_HW_SPI oled(U8G2_R0, GPIO_NUM_2, GPIO_NUM_4, GPIO_NUM_5);
EspDisplay espdisplay(&oled);

uint8_t entity_creeper_sprite[] = {0x33,0x33,0x0c,0x1e,0x1e,0x12};
uint8_t entity_dots_sprite[] = {0x2a,0x15,0x2a,0x15,0x2a,0x15};
Entity entity_creeper(Vec2(10,10), Vec2::zero, Vec2(6, 6), entity_creeper_sprite);
Entity entity_dots(Vec2(20,10), Vec2::zero, Vec2(6, 6), entity_dots_sprite);
Entity* entitylist[] = {&entity_creeper, &entity_dots};

void setup()
{
    Serial.begin(115200);
    oled.begin();
    oled.setBitmapMode(1);
}

uint8_t x = 0, y = 0;
void movePixel()
{
    if (espkeyboard.getKey(8) && y < 63)
        y++;
    if (espkeyboard.getKey(2) && y > 0)
        y--;
    if (espkeyboard.getKey(6) && x < 127)
        x++;
    if (espkeyboard.getKey(4) && x > 0)
        x--;
    Serial.printf("%u %u\n", x, y);
}

void loop()
{
    espkeyboard.update();
    // Test draw entities
    espdisplay.draw(entitylist, 2);
    // Test draw pixel
    movePixel();
    espdisplay.drawPixel(x, y);
    // Test paint and erase pixel
    espdisplay.drawPixel(1, 60);
    espdisplay.drawPixel(1, 60, false);

    // Send buffer and clear screen
    oled.sendBuffer();
    oled.clearBuffer();
    esptime.waitms(64);
}With everything we have done until now, we have a strong foundation for our 2D game. On the root of our source directory, we can now create both the header and cpp files for our game.
A feature that our game will need is a font. Not every character on the ASCII table, but just the numbers 0 to 9 are enough. We will now create a file named ‘sprites.h’ on the root of our source directory that will contain the sprites for our characters but also for the pads and ball if you wish to use:
#ifndef _sprites_h_
#define _sprites_h_

#include <inttypes.h>

#ifdef ESP32
#include <Arduino.h>
#endif

// Fix for when you remove the arduino and avr includes
#ifndef PROGMEM
#define PROGMEM
#endif

uint8_t sprite_padl[] = PROGMEM {0x04,0x02,0x05,0x05,0x05,0x05,0x05,0x05,0x02,0x04};
uint8_t sprite_padr[] = PROGMEM {0x01,0x02,0x05,0x05,0x05,0x05,0x05,0x05,0x02,0x01};

uint8_t font_0[] = PROGMEM {0x7e,0xff,0xc3,0xc3,0xc3,0xc3,0xc3,0xc3,0xff,0x7e};
uint8_t font_1[] = PROGMEM {0x1e,0x1f,0x18,0x18,0x18,0x18,0x18,0x18,0xff,0xff};
uint8_t font_2[] = PROGMEM {0x7f,0xff,0xc0,0xc0,0xc0,0xff,0x03,0x03,0xff,0xfe};
uint8_t font_3[] = PROGMEM {0x7f,0xff,0xc0,0xc0,0xc0,0xfe,0xc0,0xc0,0xff,0x7f};
uint8_t font_4[] = PROGMEM {0xc3,0xc3,0xc3,0xc3,0xc3,0xff,0xc0,0xc0,0xc0,0xc0};
uint8_t font_5[] = PROGMEM {0xff,0xff,0x03,0x03,0x03,0xff,0xc0,0xc0,0xff,0xff};
uint8_t font_6[] = PROGMEM {0xff,0xff,0x03,0x03,0x03,0xff,0xc3,0xc3,0xff,0xff};
uint8_t font_7[] = PROGMEM {0xff,0xff,0xc0,0xc0,0xc0,0xc0,0xc0,0xc0,0xc0,0xc0};
uint8_t font_8[] = PROGMEM {0x7e,0xff,0xc3,0xc3,0xc3,0x7e,0xc3,0xc3,0xff,0x7e};
uint8_t font_9[] = PROGMEM {0xff,0xff,0xc3,0xc3,0xc3,0xff,0xff,0xc0,0xc0,0xc0};
uint8_t font_Q[] = PROGMEM {0x7e,0xff,0xc3,0xc3,0xc0,0x70,0x38,0x18,0x00,0x18};

uint8_t* fontset[] = { font_0, font_1, font_2, font_3, font_4, font_5, font_6, font_7, font_8, font_9, font_Q };

#endif
To simplify the creation of the fontset you can use a tool like Lopaka.
Moving onto the game, we will import all our engine files, but no modules, as it is the job of the main file to initialize and import the modules. Then we will need a couple of things for this game to work, first and most importantly, we will need pointers to each of the modules, then we need a field size, which will be the esp’s screen size (128 by 64), then we need some floats to keep track of the ball size, pad size, pad speed and ball speed, besides the floats we will also need two uint8_t’s for the scores and five entities, the ball, pads and the scores.
The only public functions the game will have are the reset, new game tick and the constructor, but we will also have some private ones, one to give a point, two to move each of the pads and one to move the ball;
#ifndef _pong_h_
#define _pong_h_

#include "tengine/entity.h"
#include "tengine/idisplay.h"
#include "tengine/ikeyboard.h"
#include "tengine/itime.h"
#include "tengine/vec2.h"

class Pong
{
    TTime* time; /* Pointer to the time module */
    TKeyboard* keyboard; /* Pointer to the keyboard module */
    TDisplay* display; /* Pointer to the display module */

    Vec2 field_size; /* Size of the playing field */
    float ballsize; /* X and Y size of the ball (it is a square) */
    float padsize; /* Y size of the pads */
    float padspeed; /* Player pad speed */

    uint8_t lscore, rscore; /* Score */
    Entity lpad, rpad, ball, lscorenumber, rscorenumber; /* Game entity */
    float ballspeed; /* Ball speed (changes with time) */

    private:
    /* Moves the ball */
    void moveball();
    /* Moves the bot / ai */
    void moveRPad();
    /* Moves the player */
    void moveLPad(int8_t input);
    /* Increases the score for the player or the bot */
    void givePoint(bool toPlayer);

    public:
    Pong(TTime* time, TKeyboard* keyboard, TDisplay* display, Vec2 field = Vec2(128, 64), float ballsize = 3, float padsize = 10, float padspeed = 1);
    /* Resets the game to the initial state without reseting the score */
    void reset();
    /* Starts a new game */
    void newgame();

    /* Advance the simulation one step */
    void tick();
};

#endif
Moving onto the cpp file, we will include our header file, math and sprites. Looking into the constructor, we will assign the variables passed into the game, then we need to create the game entities and finally we call th new game function.
The new game function will reset the score, set the score entities sprite to ‘font_0’ and then call reset.
On the reset function we will set the ball speed to one, reset the position and direction, set the pads position, clear the screen and add a little delay.
The give point function will increase the score of the chosen player and if one reaches 10, we call the new game function, after that we also update the sprite.
The move ball function starts by adding the direction to the ball’s position, then checks for collisions with the left and right edges of the map, if it collides, gives the player, or the bot, a point and resets the game (reset pad and ball position), after that, it checks the up and down edges, where it simply sets the ball position to a point inside the field and multiplies the y direction by negative 0.9, which will slow it down vertically by 10 percent and also flip it’s vertical direction.
The move right pad function is responsible for moving the AI player’s center to the center of the ball, after that it also clamps it’s position to keep the pad inside the field.
The move left pad function is like the previous one, but instead of moving it automatically, it takes in the players input, which can either be up, down or zero.
Finally, the tick function is the heart of our game, it updates the keyboard, checks for input, moves the pads and the ball and also draws the entities into to the screen buffer.
#include "pong.h"
#include "tengine/math.h"
#include "sprites.h"

Pong::Pong(TTime* time, TKeyboard* keyboard, TDisplay* display, Vec2 field, float ballsize, float padsize, float padspeed)
{
    this->time = time;
    this->keyboard = keyboard;
    this->display = display;
    this->field_size = field;
    this->ballsize = ballsize;
    this->padsize = padsize;
    this->padspeed = padspeed;

    lpad = Entity(Vec2(10, (field_size.y - padsize) / 2), Vec2::zero, Vec2(2, padsize));
    rpad = Entity(Vec2(field_size.x - 14, (field_size.y - padsize) / 2), Vec2::zero, Vec2(2, padsize));
    ball = Entity(Vec2::zero, Vec2::zero, Vec2(ballsize, ballsize));
    lscorenumber = Entity(Vec2(field_size.x / 2 - 11 - 8, 2), Vec2::zero, Vec2(8, 10), font_0);
    rscorenumber = Entity(Vec2(field_size.x / 2 + 10, 2), Vec2::zero, Vec2(8, 10), font_0);

    newgame();
}

void Pong::newgame()
{
    lscore = 0;
    rscore = 0;
    lscorenumber.sprite = font_0;
    rscorenumber.sprite = font_0;
    reset();
}

void Pong::reset()
{
    ballspeed = 1.0;
    ball.pos = field_size / 2.0;
    ball.dir = Vec2(0.672673, 0.73994); /* Pre calculated normalized value */
    lpad.pos.y = (field_size.y / 2.0) - (lpad.size.y / 2.0);
    rpad.pos.y = lpad.pos.y;
    // Blink display (black, display now)
    display->fill(false, true);
    time->waitms(500);
}


void Pong::givePoint(bool toPlayer)
{
    if (toPlayer)
        lscore++;
    else
        rscore++;
    // new game once someone reaches 10 points
    if (rscore > 9 || lscore > 9)
        newgame();
    // update score sprite
    lscorenumber.sprite = fontset[lscore];
    rscorenumber.sprite = fontset[rscore];
}

void Pong::moveball()
{
    // move ball
    ball.pos += ball.dir;

    // left right edge collision
    if (ball.pos.x < 0)
    {
        reset();
        ball.dir.x *= -1;
        givePoint(false);
    }
    if (ball.pos.x > (field_size.x - ball.size.x - 1))
    {
        reset();
        givePoint(true);
    }

    // up down edge collision
    if (ball.pos.y < 0)
    {
        ball.pos.y = 0;
        ball.dir.y *= -0.9;
    }
    if (ball.pos.y >= (field_size.y - ball.size.y - 1))
    {
        ball.pos.y = field_size.y - ball.size.y - 1;
        ball.dir.y *= -0.9;
    }

    // check collisions with pad
    int8_t col = 0;
    if (Entity::col(lpad, ball))
        col = 1;
    if (Entity::col(rpad, ball))
        col = -1;

    // handle collisions
    if (col)
    {
        Entity* pad = &lpad;
        if (col > 0)
        {
            ball.pos.x = pad->pos.x + pad->size.x;
            ball.dir.x = 1;
        }
        else
        {
            pad = &rpad;
            ball.pos.x = pad->pos.x - pad->size.x - 1;
            ball.dir.x = -1;
        }
        // calculate hit pos and ball direction
        vec2_type hitpos = pad->pos.y + pad->size.y - (ball.pos.y + (ball.size.y / 2.0));
        ball.dir.y = TMath::scale(hitpos, 0, pad->size.y, 2, -2);
        ball.dir.normalize();
        ball.dir *= ballspeed;
        ballspeed += 0.1;
    }
}

void Pong::moveRPad()
{
    vec2_type ballcenter = ball.pos.y + (ball.size.y / 2.0);
    vec2_type padcenter = rpad.pos.y + (rpad.size.y / 2.0);
    vec2_type rpadspeed = padspeed * 0.95;

    // Move pad center to ball center
    if (ballcenter < padcenter)
        rpad.pos.y -= TMath::minabs(ballcenter - padcenter, rpadspeed);
    else
        rpad.pos.y += TMath::minabs(ballcenter - padcenter, rpadspeed);

    // Prevent going outside of bounds
    if (rpad.pos.y < 0)
        rpad.pos.y = 0;
    if (rpad.pos.y > field_size.y - rpad.size.y - 1)
        rpad.pos.y = field_size.y - rpad.size.y - 1;
}

void Pong::moveLPad(int8_t input)
{
    if (!input)
        return;
    // Go up
    if (input > 0)
    {
        lpad.pos.y -= padspeed;
        if (lpad.pos.y < 0)
            lpad.pos.y = 0;
    }
    else // go down
    {
        lpad.pos.y += padspeed;
        if (lpad.pos.y > field_size.y - lpad.size.y - 1)
            lpad.pos.y = field_size.y - lpad.size.y - 1;
    }
}

void Pong::tick()
{
    // Get input
    keyboard->update();

    // Normal game loop if key D is not pressed
    if (!keyboard->getKey(0xD))
    {
        // get player input
        int8_t input = 0;
        if (keyboard->getKey(0x2))
            input++;
        if (keyboard->getKey(0x8))
            input--;
        // move player
        moveLPad(input);
        // move bot and ball
        moveRPad();
        moveball();
    }
    else // New game if D is pressed
        newgame();

    // Draw game objects
    Entity* entities[] = { &lpad, &rpad, &ball, &lscorenumber, &rscorenumber };
    display->draw(entities, 5);
}
Now that we have our game, the only thing remaining is to call it on the main file, for that, we start by including our game and the esp modules, then we initialize the time, keyboard and display, but also our game, by passing in the reference to the modules then, on setup, we initialize the Serial port, begin the oled and set it’s bitmap mode to 1 (black in sprite is transparent), finally on our loop, we call our game’s tick function, and then send, clear the oled’s buffer and then add a small delay to make the game run at about 60 frames per second:
#include <Arduino.h>
#include <U8g2lib.h>
#include "pong.h"

#include "modules/esp_time.h"
#include "modules/esp_keyboard.h"
#include "modules/esp_display.h"

EspTime esptime;
gpio_num_t keypins[] = { GPIO_NUM_27, GPIO_NUM_26, GPIO_NUM_25, GPIO_NUM_33, GPIO_NUM_35, GPIO_NUM_34, GPIO_NUM_39, GPIO_NUM_36 };
EspKeyboard espkeyboard(keypins);
U8G2_SH1106_128X64_NONAME_F_4W_HW_SPI oled(U8G2_R0, GPIO_NUM_2, GPIO_NUM_4, GPIO_NUM_5);
EspDisplay espdisplay(&oled);

Pong game(&esptime, &espkeyboard, &espdisplay);

void setup()
{
    Serial.begin(115200);
    oled.begin();
    oled.setBitmapMode(1);
}

void loop()
{
    game.tick();

    // Send buffer and clear screen
    oled.sendBuffer();
    oled.clearBuffer();
    esptime.waitmicro(15625);
}
6 - Conclusion
Making a multi platform game can be a little troublesome because we need to account for the differences in each platform, but as you saw in this small project, if you make interfaces and common libraries and files that abstract the platform specific code, making a game run anywhere is pretty easy.
I hope this article gave you a little of motivation to port an easy game to a specific system you like a lot, for example an old console like the PSP, Vita or even the 3DS or some micro controller like an STM or an Arduino, before we post it’s article.
If you want to make this game work on Linux don’t miss our next article, also, if you want to make your own sprites like the pads in the following video, use Lopaka, it is a very good web editor for monochrome displays!
As always, thanks for reading and stay tuned for more tech insights and tutorials. Until next time, and keep exploring the world of tech!