
The Esp32 has become a go-to coice for IoT and embedded applications. One of its standout features is the integrated BLE capability. In this article we will explore the basics of BLE including a server and a client.
This article is best followed if you have two Esp32s (buy here) but you can make it work with just one and your phone. You also need Platform IO (tutorial) or the Arduino IDE (tutorial).
Let’s start by creating a file named ‘common.h’ which will keep values used in both the server and the client. Include ‘BLEUtils.h’ to have access to uuids and create 3, one for the service and the other two for the characteristics:
#ifndef common_h
#define common_h

#include <BLEUtils.h>

#define BLE_SERVICE "91c9af97-7688-4331-8a56-d247903eaaf8"
const static BLEUUID BLE_SERVICE_UUID(BLE_SERVICE);
#define BLE_READ_CHARACTERISTIC "ad95a2b5-7568-4af9-a6e7-54cd0de114ab"
const static BLEUUID BLE_READ_CHARACTERISTIC_UUID(BLE_READ_CHARACTERISTIC);
#define BLE_WRITE_CHARACTERISTIC "3e516cde-8678-4dd9-9b68-145ed925f191"
const static BLEUUID BLE_WRITE_CHARACTERISTIC_UUID(BLE_WRITE_CHARACTERISTIC);

#endifWhile creating the server, you will need to give each service and each characteristic a unique uuid, you can use this website to generate a random uuid for testing. If you are going to transmit readings from known sensors take a look at this document at Bluetooth.com, in page 82 you can find the uuids for common sensors and services, like battery level, temperature, heart rate, time, volume, etc. On the same document, on page 81 you can find the ids for the descriptors, and on page 66, you can find ids for the services.
#ifndef blesv_h
#define blesv_h

#include <Arduino.h>

void blesv_init(String device_name);
void blesv_tick();

#endif
On the ‘cpp’ file for the server, start by adding the includes. We will use the ‘common.h’ file created before as we will need the uuids defined in it and then the BLE Utils, Server, Device and Service:
#include "blesv.h"
#include "common.h"

#include <Arduino.h>
#include <BLEUtils.h>
#include <BLEServer.h>
#include <BLEDevice.h>
#include <BLEService.h>
Now we need to create a class that will house the callbacks. Those callbacks will be executed when certain things happen, for example, ‘OnWrite’ is called when a client writes to a characteristic in the server.
In this example class, every callback simply logs on Serial:
class BLE_ch_callbacks: public BLECharacteristicCallbacks
{
    /**
	 * @brief Callback function to support a read request.
	 * @param [in] pCharacteristic The characteristic that is the source of the event.
	 * @param [in] param The BLE GATTS param. Use param->read.
	 */
    virtual void onRead(BLECharacteristic* pCharacteristic, esp_ble_gatts_cb_param_t* param) override
    {
        String msg = "Value of ";
        msg.concat(pCharacteristic->getUUID().toString().c_str());
        msg.concat(" read");
        Serial.println(msg);
    }

    /**
	 * @brief Callback function to support a write request.
	 * @param [in] pCharacteristic The characteristic that is the source of the event.
	 * @param [in] param The BLE GATTS param. Use param->write.
	 */
	virtual void onWrite(BLECharacteristic* pCharacteristic, esp_ble_gatts_cb_param_t* param) override
    {
        String msg = "Value of ";
        msg.concat(pCharacteristic->getUUID().toString().c_str());
        msg.concat(" written: ");
        msg.concat(pCharacteristic->getValue().c_str());
        Serial.println(msg);
    }

    /**
	 * @brief Callback function to support a Notify request.
	 * @param [in] pCharacteristic The characteristic that is the source of the event.
	 */
	virtual void onNotify(BLECharacteristic* pCharacteristic) override
    {
        String msg = "Notify from ";
        msg.concat(pCharacteristic->getUUID().toString().c_str());
        Serial.println(msg);
    }

	/**
	 * @brief Callback function to support a Notify/Indicate Status report.
	 * @param [in] pCharacteristic The characteristic that is the source of the event.
	 * @param [in] s Status of the notification/indication
	 * @param [in] code Additional code of underlying errors
	 */
	virtual void onStatus(BLECharacteristic* pCharacteristic, Status s, uint32_t code) override
    {
        String msg = "Status from ";
        msg.concat(pCharacteristic->getUUID().toString().c_str());
        msg.concat(": ");
        msg.concat(std::to_string(s).c_str());
        Serial.println(msg);
    }
};
With the callbacks ready, let’s create the instances and pointers we will use:
BLEServer* ble_server;
BLEService* ble_service;
BLEDescriptor read_charect_descriptor("2902", 100);
BLECharacteristic* read_charect;
BLECharacteristic* write_charect;
BLE_ch_callbacks ble_ch_callbacks;
On the init funcion, start by initializing the ble device by giving it a name, then create a server and service, register the characteristics, start the service and finally, setup advertising and start it:
void blesv_init(std::__cxx11::string device_name)
{
    // Create server and service
    BLEDevice::init(device_name);
    ble_server = BLEDevice::createServer();
    ble_service = ble_server->createService(BLE_SERVICE);

    // Setup read characteristic
    read_charect = ble_service->createCharacteristic(BLE_READ_CHARACTERISTIC, BLECharacteristic::PROPERTY_READ | BLECharacteristic::PROPERTY_NOTIFY);
    read_charect_descriptor.setValue("Notifications enabled");
    read_charect->addDescriptor(&read_charect_descriptor);
    read_charect->setCallbacks(&ble_ch_callbacks);
    read_charect->setValue(0);

    // Setup write charect
    write_charect = ble_service->createCharacteristic(BLE_WRITE_CHARACTERISTIC, BLECharacteristic::PROPERTY_WRITE);
    write_charect->setCallbacks(&ble_ch_callbacks);
    write_charect->setValue(0);

    // Start service
    ble_service->start();

    // Setup advertising
    auto advert = BLEDevice::getAdvertising();
    advert->addServiceUUID(BLE_SERVICE);
    advert->setScanResponse(true);
    advert->setMinPreferred(0x06); // iphone fix?
    advert->setMaxPreferred(0x12);

    // Start advertising
    BLEDevice::startAdvertising();
    Serial.println("Started BLE Server");
}
Before the ‘blesv_tick’ function, create an int variable to keep track of the value of the read characteristic and, in the function, increment it’s value, set it on the characteristic, notify clients and add a small delay:
uint32_t blesv_counter = 0;
void blesv_tick()
{
    blesv_counter++;
    // change value and notify
    read_charect->setValue(blesv_counter);
    read_charect->notify(true);
    delay(100);
}
On ‘main.c’, include ‘blesv.h’, on setup begin Serial and initialize the BLE server and on loop run the ‘tick’ function:
#include <Arduino.h>
#include "blesv.h"

void setup()
{
    // put your setup code here, to run once:
    Serial.begin(115200);
    blesv_init("TMVEsp32");
}

void loop()
{
    // put your main code here, to run repeatedly:
    blesv_tick();
}
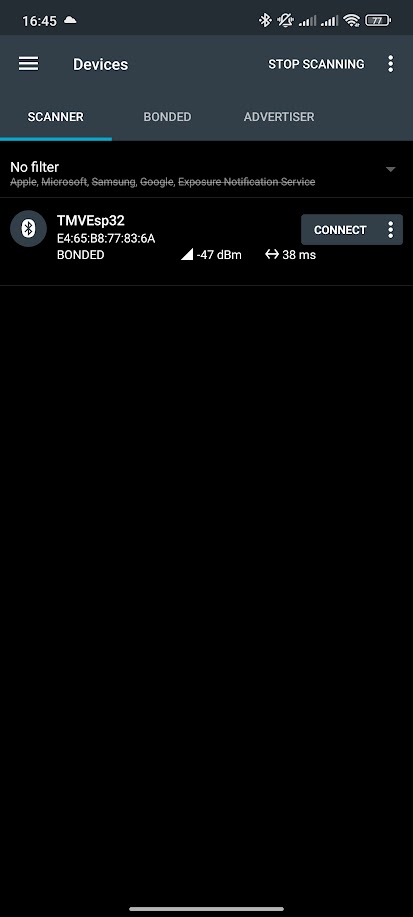
After uploading the code, go to your phone and install nRF Connect.
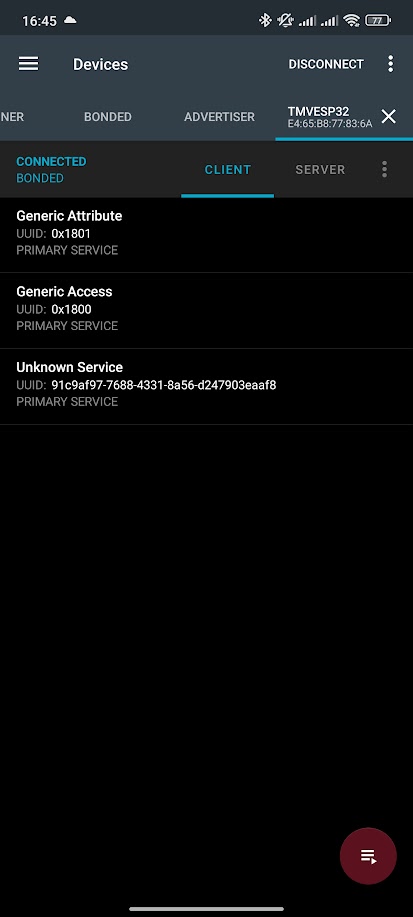
On Devices, go to Scanner and look for your Esp then click connect. You should be able to see an ‘Unknown Service’, and if you check it’s UUID, you would see that it is the same one you set in the ‘common.h’ file:
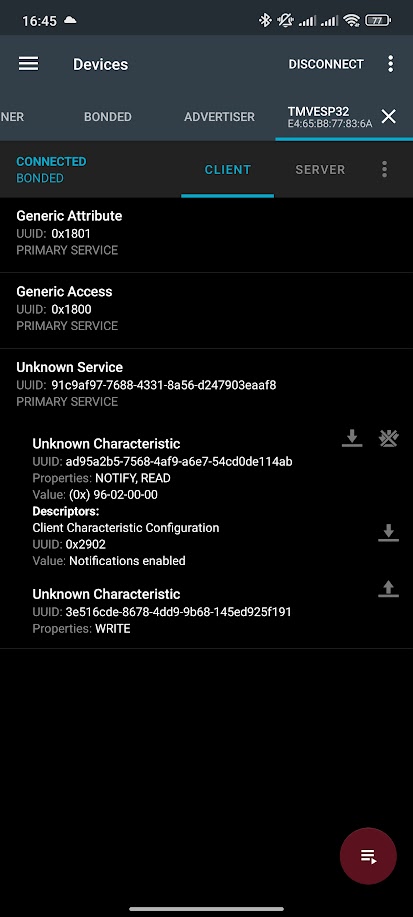
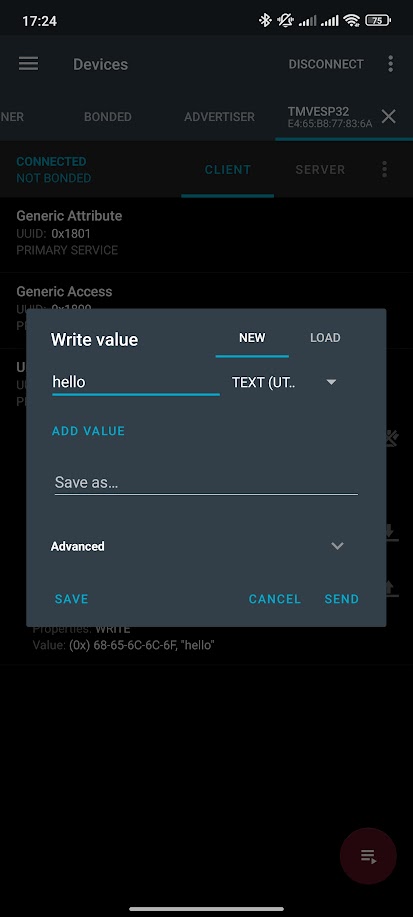
If you click on the service you should also see two characteristics, one should be our read characteristic and the other the write one, you can tell them appart by the arrows next to them. You can also verify that the read characteristic has notifications by the presence of the 3 arrows icon, if you click it, you should see the value update very fast. If you send text you should also see it appear in the Serial output of the Esp.
You might notice that if you connect and then disconnect, you can’t find your Esp anymore, that is because it stops advertising after receiving a connection, to fix that, create the following class to host the callbacks for the BLE Server:
class BLE_sv_callbacks: public BLEServerCallbacks
{
    virtual void onConnect(BLEServer* pServer) override
    {
        BLEDevice::startAdvertising();
    }

    virtual void onDisconnect(BLEServer* pServer) override
    {
        BLEDevice::startAdvertising();
    }
};
// instance
BLE_sv_callbacks ble_sv_callbacks;
On server init, you will need to set the callbacks we just created in the server. You can do that by adding the following line in ‘blesv.cpp’ -> ‘blesv_init’:
// ...
BLEDevice::init(device_name.c_str());
ble_server = BLEDevice::createServer();
ble_server->setCallbacks(&ble_sv_callbacks); // add this line
ble_service = ble_server->createService(BLE_SERVICE);
// ...With the server up and running, we now need a client to connect to it. Before continuing i really recommend you check that your server is working as intended by using the app mentioned before.
Let’s start with the header file, like the server it will only have two functions, one to run on setup and another to run on loop:
#ifndef blecl_h
#define blecl_h

#include <Arduino.h>

void blecl_init();
void blecl_tick();

#endif
On the cpp file, start by adding the includes, from our files, include ‘common’ and the header file for the client, then include ‘Arduino’ and ‘BLEDevice’:
#include "blecl.h"
#include "common.h"

#include <Arduino.h>
#include <BLEDevice.h>
Before starting to actually implement the server let’s, before, make a function to transform a ‘uin32’ to an hexadecimal string. We will use this function to then print the data we receive from the server. which you can then compare with the data received on your phone.
static uint8_t blecl_hexchars[] = {'0','1','2','3','4','5','6','7','8','9','A','B','C','D','E','F'};
String blecl_byteToHex(uint8_t val)
{
    // split into 2 x 4 bits
    uint8_t a = (val & (0xF0)) >> 4;
    uint8_t b =  val & (0x0F);

    // Get characters and concat them together
    String ret = String((char)blecl_hexchars[a]);
    ret.concat((char)blecl_hexchars[b]);
    return ret;
}
String blecl_int32ToHex(uint32_t val)
{
    // Split into 4 x byte
    uint8_t a = (val & 0xFF000000) >> 24;
    uint8_t b = (val & 0x00FF0000) >> 16;
    uint8_t c = (val & 0x0000FF00) >> 8;
    uint8_t d = (val & 0x000000FF);

    // Get each byte to Hex and concat
    String ret = blecl_byteToHex(d);
    ret.concat('-');
    ret.concat(blecl_byteToHex(c));
    ret.concat('-');
    ret.concat(blecl_byteToHex(b));
    ret.concat('-');
    ret.concat(blecl_byteToHex(a));
    return ret;
}
For this client we will need 3 flags, two characteristics (one for read and one for write) and the advertised device:
static bool blecl_doScan = false;
static bool blecl_doConnect = false;
static bool blecl_connected = false;
static BLERemoteCharacteristic* blecl_remoteReadChar;
static BLERemoteCharacteristic* blecl_remoteWriteChar;
static BLEAdvertisedDevice* blecl_device;
To receive the notifications from the server we will need a callback, on this example, we simply log the data received:
static void blecl_onnotify(BLERemoteCharacteristic* remoteChar, uint8_t* data, size_t len, bool isNotify)
{
    Serial.print("Notify callback for characteristic ");
    Serial.print(remoteChar->getUUID().toString().c_str());
    Serial.print(" of data length ");
    Serial.println(len);
    Serial.print("data: ");
    if (len >= 4)
        Serial.println(blecl_int32ToHex(*((uint32_t*)data)));
    else
        Serial.println((char*)data);
}
To handle disconnections, we need to create a class that inherits from ‘BLEClientCallbacks’ and, in it, set ‘blecl_connected’ to false on disconnect:
class BLE_cliCallbacks : public BLEClientCallbacks
{
    void onConnect(BLEClient *pclient) {}

    void onDisconnect(BLEClient *pclient)
    {
        blecl_connected = false;
    }
};
static BLE_cliCallbacks blecl_clicallbacks;
With the callbacks ready, we can now make the function that will create the client and connect to the server. Create a client, set it’s callbacks, connect to the advertised we will get after scanning, check if it contains your service, check if the service contains the characteristics with the permissions you need, register the notify callback and set connected to true:
bool blecl_connect()
{
    BLEClient *client = BLEDevice::createClient();

    client->setClientCallbacks(&blecl_clicallbacks);
    client->connect(blecl_device);

    // Check if service exists
    BLERemoteService *service = service = client->getService(BLE_SERVICE_UUID);
    if (!service)
    {
        client->disconnect();
        return false;
    }

    // Check if characteristics exit
    blecl_remoteReadChar = service->getCharacteristic(BLE_READ_CHARACTERISTIC_UUID);
    blecl_remoteWriteChar = service->getCharacteristic(BLE_WRITE_CHARACTERISTIC_UUID);
    if (!blecl_remoteReadChar || !blecl_remoteWriteChar)
    {
        client->disconnect();
        return false;
    }

    // Try read readChar
    if (blecl_remoteReadChar->canRead())
    {
        uint32_t val = blecl_remoteReadChar->readUInt32();

        String log = String("Read Charact value: ");
        log.concat(String(val));
        Serial.println(log);
    }

    // Try to register for notify
    if (blecl_remoteReadChar->canNotify())
    {
        blecl_remoteReadChar->registerForNotify(blecl_onnotify);
    }

    // Set as connected
    blecl_connected = true;
    return true;
As for the scan callbacks, you just need to check if it contains your service ID, and if it does, stop the scan, save the device and set the flags ‘doConnect’ and ‘doScan’:
class BLE_advCallbacks : public BLEAdvertisedDeviceCallbacks
{
    void onResult(BLEAdvertisedDevice advertDevice) override
    {
        Serial.println(String("[BLE] Device found: ").concat(advertDevice.toString().c_str()));

        // If has our service, it is the right device
        if (advertDevice.haveServiceUUID() && advertDevice.isAdvertisingService(BLE_SERVICE_UUID))
        {
            // Stop scan and save device to connect to
            BLEDevice::getScan()->stop();
            blecl_device = new BLEAdvertisedDevice(advertDevice);
            blecl_doConnect = true;
            blecl_doScan = true;
        }
    }
};
static BLE_advCallbacks blecl_advcallbacks;
On init, initialize the BLE Device, get the scanner, set the callbacks, window and as active and start a scan for 5 seconds:
void blecl_init()
{
    BLEDevice::init("");
    BLEScan *scan = BLEDevice::getScan();
    scan->setAdvertisedDeviceCallbacks(&blecl_advcallbacks);
    scan->setWindow(10);
    scan->setActiveScan(true);
    scan->start(5, false);
}
On loop, log the connection attempt status, if connected, write a message to the write Characteristic and if not connected, start scanning, and then add a small delay:
void blecl_tick()
{
    if (blecl_doConnect)
    {
        if (blecl_connect())
            Serial.println("[BLE] Connected");
        else
            Serial.println("[BLE] Failed to connect");
        blecl_doConnect = false;
    }

    if (blecl_connected)
    {
        if (blecl_remoteWriteChar->canWrite())
        {
            String v = "Time since boot: " + String(millis() / 1000);
            blecl_remoteWriteChar->writeValue(v.c_str(), v.length());
        }
    }
    else
    {
        BLEDevice::getScan()->start(5);
    }

    delay(1000);
}
Finally, on main, add init to setup and tick to loop, and you are done!
#include <Arduino.h>
#include "blecl.h"

void setup()
{
    // put your setup code here, to run once:
    Serial.begin(115200);
    //blesv_init("TMVEsp32");
    blecl_init();
}

void loop()
{
    // put your main code here, to run repeatedly:
    //blesv_tick();
    blecl_tick();
}
Thanks for reading and stay tuned for more tech insights and tutorials. Until next time, and keep exploring the world of tech!