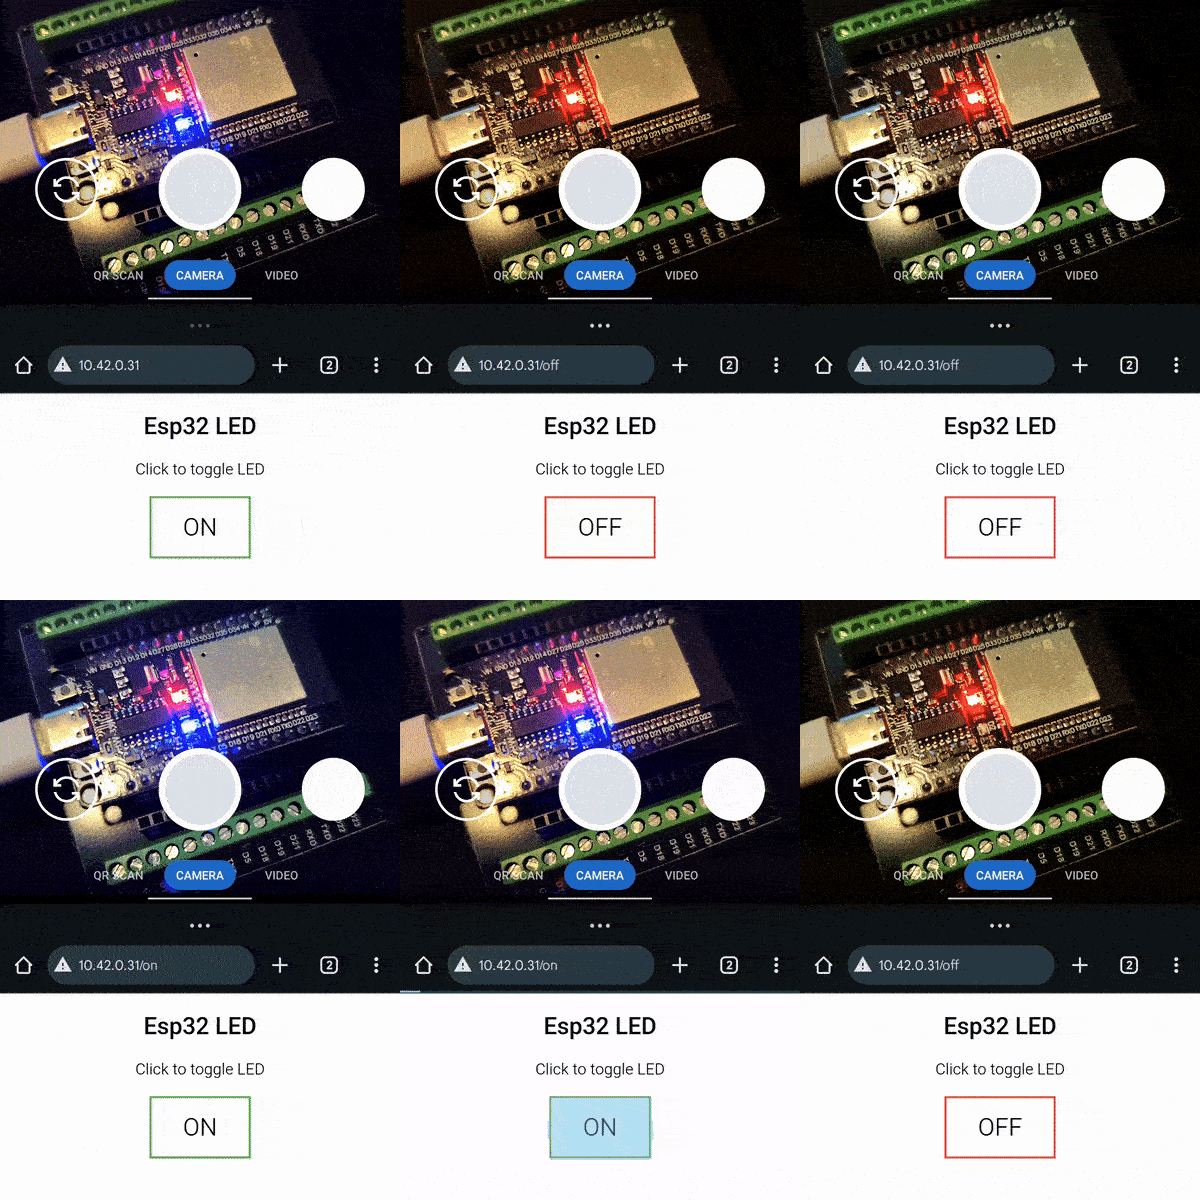
0 - Introduction
One of the best features of the Esp32 is it’s WiFi capabilities and, in this article, we will use said capabilities to host a very simple Web Server that will control a LED.
For this you only need one Esp32, as the LED we will control is the onboard one.
1 - Web Page
Let’s start by making a simple web page in html that will be displayed on your browser. I used an example from this article.
Styling is completely optional, you really only need the ‘meta’ tag in ‘head’ and the ‘body’ of the document.
You can test this page in the interactive demo here or on any browsre you have by saving the file ‘.html’, but keep in mind that in different browsers it might also look different:
<!DOCTYPE HTML>
<html>
    <head>
        <meta name="viewport" content="width=device-width, initial-scale=1" <link rel="icon" href="data:,">
        <style>
            html {
                font-family: Roboto;
                display: inline-block;
                margin: 0px auto;
                text-align: center;
            }

            .button {
                background-color: #4CAF50;
                border: none;
                color: white;
                padding: 15px 32px;
                text-align: center;
                text-decoration: none;
                display: inline-block;
                font-size: 16px;
                margin: 4px 2px;
                cursor: pointer;
                text-decoration: none;
                font-size: 25px;
                margin: 2px;
                cursor: pointer;
            }

            .button_ON {
                background-color: white;
                color: black;
                border: 2px solid #4CAF50;
            }

            .button_OFF {
                background-color: white;
                color: black;
                border: 2px solid #f44336;
            }
        </style>
    </head>

    <body>
        <h2>Esp32 LED</h2>
        <p>Click to toggle LED</p>

        <!-- Only show one at a time -->
        <p><a href="/off"><button class="button button_ON">ON</button></a></p>
        <p><a href="/on"><button class="button button_OFF">OFF</button></a></p>

    </body>
</html>
2 - Code
For the Esp program, we will need two includes, ‘Arduino.h’ and ‘WiFi.h’, besides that, we will also need to define the led pin, your WiFi’s SSID (network name) and password, and create a variable for the led state and the web server:
#include <Arduino.h>
#include <WiFi.h>

// WiFi network name
const char *wifi_ssid = "wifissid";
// WiFi network password
const char *wifi_pass = "wifipassword";

// Http webserver on port 80
WiFiServer sv(80);

// Led pin (onboard is D2)
#define LED_PIN GPIO_NUM_2
// Led state (1 on or 0 off)
uint8_t led_state = 1;
The next step is to convert the HTML page we made previously into C++ strings for the functions of the WebServer (if you have a SD card reader, you can try to use that to load the HTML pages). You might have noticed that there are 4 lines on top of the html page, those lines are the HTTP Header and it’s very important, as HTML pages are sent via the HTTP protocol.
// Send HTML page
void sendHtml(WiFiClient cli)
{
    cli.println(
        "HTTP/1.1 200 OK\n"
        "Content-Type: text/html\n"
        "Connection: close\n"
        "\n"
        "<!DOCTYPE html>\n"
        "<html>\n"
        "    <head>\n"
        "        <meta name=\"viewport\" content=\"width=device-width, initial-scale=1\"\n"
        "        <link rel=\"icon\" href=\"data:,\">\n"
        "        <style>\n"
        "            html { font-family: Roboto; display: inline-block; margin: 0px auto; text-align: center;}\n"
        "            .button {background-color: #4CAF50; border: none; color: white; padding: 15px 32px; text-align: center; text-decoration: none; display: inline-block;\n"
        "                      font-size: 16px;margin: 4px 2px; cursor: pointer;text-decoration: none; font-size: 25px; margin: 2px; cursor: pointer;}\n"
        "            .button_ON {background-color: white; color: black; border: 2px solid #4CAF50;}\n"
        "            .button_OFF {background-color: white; color: black; border: 2px solid #f44336;}\n"
        "        </style>\n"
        "    </head>\n"
        "    <body>\n"
        "        <h2>Esp32 LED</h2>\n"
        "        <p>Click to toggle LED</p>\n"
    );
    cli.println(led_state ? // Only send relevant button
        "        <p><a href=\"/off\n\"><button class=\"button button_ON\">ON</button></a></p>\n"
        :
        "        <p><a href=\"/on\n\"><button class=\"button button_OFF\">OFF</button></a></p>\n"
    );
    cli.println(
        "    </body>\n"
        "</html>"
    );
}
Now that we have the page to send ready, let’s make the function that initializes the WiFi and the Server:
// Initialize and start the Server
void initWiFiServer()
{
    // Set as Wifi Station (client, needs an access point to connect to)
    WiFi.mode(WIFI_STA);
    // Connect to your WiFi network
    WiFi.begin(wifi_ssid, wifi_pass);
    // Wait for connection (Be carefull as the Esp can be stuck here forever)
    Serial.print("Connecting to WiFi ..");
    while (WiFi.status() != WL_CONNECTED)
    {
        Serial.print('.');
        delay(1000);
    }
    // Print local IP
    Serial.println();
    Serial.println(WiFi.localIP());
    // Start server
    sv.begin();
}
On the setup function, init the serial connection, set the led pin as output and turn it on and initialize the WiFi and server:
// Runs once at power on
void setup()
{
    // Initialize serial port
    Serial.begin(115200);
    Serial.println("Hello");

    // Set led pin as output and turn it on
    pinMode(LED_PIN, OUTPUT);
    digitalWrite(LED_PIN, led_state);
    // Connect to WiFi and init server
    initWiFiServer();
}
Finally, you need a string variable to store the data received and, in the loop, you accept and process incoming requests:
// String to store the received data
String request = "";
// Loop forever
void loop()
{
    // Accept connections
    WiFiClient cli = sv.available();

    // Return if client is invalid
    if (!cli)
        return;

    // Repeat while client is connected
    while (cli.connected())
    {   // if client is available
        if (cli.available())
        {
            // Read and store char received
            char c = cli.read();
            request += c;

            // When finished receiving header
            if (c == '\n')
            {
                // Handle path /off
                if (request.indexOf("GET /off") != -1)
                {
                    Serial.println("GET /off");
                    led_state = 0; // turn led off
                }
                // Handle path /on
                else if (request.indexOf("GET /on") != -1)
                {
                    Serial.println("GET /on");
                    led_state = 1; // turn led on
                }
                else // invalid path or no path
                    Serial.println("GET /");
                // Switch led state
                digitalWrite(LED_PIN, led_state);
                // send html page
                sendHtml(cli);
                // exit loop
                break;
            }
        }
    }
    // small delay to avoid problems
    delay(5);
    // clear receive "buffer"
    request = "";
    // close client connection
    cli.stop();
}
And that’s it, you should now be able to turn your LED on or off on your phone’s or pc’s browser.
Thanks for reading and stay tuned for more tech insights and tutorials. Until next time, keep exploring the world of tech!

Bonus - All Code
#include <Arduino.h>
#include <WiFi.h>

// WiFi network name
const char *wifi_ssid = "";
// WiFi network password
const char *wifi_pass = "";

// Http webserver on port 80
WiFiServer sv(80);

// Led pin (onboard is D2)
#define LED_PIN GPIO_NUM_2
// Led state (1 on or 0 off)
uint8_t led_state = 1;

// Send HTML page
void sendHtml(WiFiClient cli)
{
    cli.println(
        "HTTP/1.1 200 OK\n"
        "Content-Type: text/html\n"
        "Connection: close\n"
        "\n"
        "<!DOCTYPE HTML>\n"
        "<html>\n"
        "    <head>\n"
        "        <meta name=\"viewport\" content=\"width=device-width, initial-scale=1\"\n"
        "        <link rel=\"icon\" href=\"data:,\">\n"
        "        <style>\n"
        "            html { font-family: Roboto; display: inline-block; margin: 0px auto; text-align: center;}\n"
        "            .button {background-color: #4CAF50; border: none; color: white; padding: 15px 32px; text-align: center; text-decoration: none; display: inline-block;\n"
        "                      font-size: 16px;margin: 4px 2px; cursor: pointer;text-decoration: none; font-size: 25px; margin: 2px; cursor: pointer;}\n"
        "            .button_ON {background-color: white; color: black; border: 2px solid #4CAF50;}\n"
        "            .button_OFF {background-color: white; color: black; border: 2px solid #f44336;}\n"
        "        </style>\n"
        "    </head>\n"
        "    <body>\n"
        "        <h2>Esp32 LED</h2>\n"
        "        <p>Click to toggle LED</p>"
    );
    cli.println(led_state ? // Only send relevant button
        "<p><a href=\"/off\n\"><button class=\"button button_ON\">ON</button></a></p>"
        :
        "<p><a href=\"/on\n\"><button class=\"button button_OFF\">OFF</button></a></p>"
    );
    cli.println(
        "    </body>\n"
        "</html>"
    );
}


// Initialize and start the Server
void initWiFiServer()
{
    // Set as Wifi Station (client, needs an access point to connect to)
    WiFi.mode(WIFI_STA);
    // Connect to your WiFi network
    WiFi.begin(wifi_ssid, wifi_pass);
    // Wait for connection (Be carefull as the Esp can be stuck here forever)
    Serial.print("Connecting to WiFi ..");
    while (WiFi.status() != WL_CONNECTED)
    {
        Serial.print('.');
        delay(1000);
    }
    // Print local IP
    Serial.println();
    Serial.println(WiFi.localIP());
    // Start server
    sv.begin();
}

// Runs once at power on
void setup()
{
    // Initialize serial port
    Serial.begin(115200);
    Serial.println("Hello");

    // Set led pin as output and turn it on
    pinMode(LED_PIN, OUTPUT);
    digitalWrite(LED_PIN, led_state);
    // Connect to WiFi and init server
    initWiFiServer();
}

// String to store the received data
String request = "";
// Loop forever
void loop()
{
    // Accept connections
    WiFiClient cli = sv.available();

    // Return if client is invalid
    if (!cli)
        return;

    // Repeat while client is connected
    while (cli.connected())
    {   // if client is available
        if (cli.available())
        {
            // Read and store char received
            char c = cli.read();
            request += c;

            // When finished receiving header
            if (c == '\n')
            {
                // Handle path /off
                if (request.indexOf("GET /off") != -1)
                {
                    Serial.println("GET /off");
                    led_state = 0; // turn led off
                }
                // Handle path /on
                else if (request.indexOf("GET /on") != -1)
                {
                    Serial.println("GET /on");
                    led_state = 1; // turn led on
                }
                else // invalid path or no path
                    Serial.println("GET /");
                // Switch led state
                digitalWrite(LED_PIN, led_state);
                // send html page
                sendHtml(cli);
                // exit loop
                break;
            }
        }
    }
    // small delay to avoid problems
    delay(5);
    // clear receive "buffer"
    request = "";
    // close client connection
    cli.stop();
}
