0 - Introduction
This small project will show you how to use an Esp32 to control a small buzzer using RTOS tasks, making you able to run other code while the music is playing. For this, you will need:
- 1x Esp32
- 1x Buzzer
- 1x Potentiometer
- 1x Led (optional)
- 1x Breadboard
- Atleast 7 small cables (8 if using LED)
Before you start, make sure you have Platform IO installed and with the Espressif 32 platform, you can learn how to install them in this article.

1 - Code
Start by creating a new project and deleting the example function. In this project we will only need the ‘Arduino’ include. Let’s start with the variables and defines we need before the setup:
#include <Arduino.h>

// Ledc channel (0 - 15)
#define LEDC_CHANNEL_0 0
// Accuracy of the timer (1 - 16)
#define LEDC_TIMER_13_BIT 13
// Buzzer pin
#define BUZZER_PIN GPIO_NUM_4

// Melody Note, contains the frequency and the duration
struct MelodyNote
{
    int freq;
    int duration;
};
Now that we have a way to represent a note, let’s write a melody, in this case i found this Super Mario song on keystudio.com:
// Melody
const struct MelodyNote Melody[] = PROGMEM {
    {330, 8},{330, 4},{330, 4},{262, 8},{330, 4},{392, 2},{196, 2},{262, 3},
    {196, 3},{165, 3},{220, 4},{247, 4},{233, 8},{220, 4},{196, 8},{330, 8},
    {392, 8},{440, 4},{349, 8},{392, 4},{330, 3},{262, 8},{294, 8},{247, 3},
    {262, 3},{196, 3},{165, 3},{220, 4},{247, 4},{233, 8},{220, 4},{196, 8},
    {330, 8},{392, 8},{440, 4},{349, 8},{392, 4},{330, 3},{262, 8},{294, 8},
    {247, 2},{392, 8},{370, 8},{330, 8},{311, 4},{330, 4},{208, 8},{220, 8},
    {262, 4},{220, 8},{262, 8},{294, 3},{392, 8},{370, 8},{330, 8},{311, 4},
    {330, 4},{523, 4},{523, 8},{523, 2},{392, 8},{370, 8},{330, 8},{311, 4},
    {330, 4},{208, 8},{220, 8},{262, 4},{220, 8},{262, 8},{294, 3},{311, 3},
    {294, 3},{262, 1},{262, 8},{262, 4},{262, 4},{262, 8},{294, 4},{330, 8},
    {262, 4},{220, 8},{196, 2},{262, 8},{262, 4},{262, 4},{262, 8},{294, 4},
    {330, 1},{262, 8},{262, 4},{262, 4},{262, 8},{294, 4},{330, 8},{262, 4},
    {220, 8},{196, 2}
};
// Melody Size (array size in bytes divided by struct size in bytes)
#define MelodySize sizeof(Melody) / sizeof(MelodyNote)
The next step is to make a function that will play our song:
void playMelody()
{
    // Variable that will hold the real note duration
    int noteDuration;
    // Play melody
    for (int i = 0; i < MelodySize; i++)
    {
        // Calculate duration
        noteDuration = 800 / Melody[i].duration;
        // Setup note
        ledcSetup(LEDC_CHANNEL_0, Melody[i].freq * 2, LEDC_TIMER_13_BIT);
        // Set pin
        ledcAttachPin(BUZZER_PIN, LEDC_CHANNEL_0);
        // Play note
        ledcWrite(LEDC_CHANNEL_0, 50);
        // Delay
        delay(noteDuration * 1.30); //delay
    }
    // Stop playing
    ledcDetachPin(BUZZER_PIN);
}
If you now add this function to setup, it should work! But don’t forget to set the buzzer pin to output:
void setup()
{
    pinMode(BUZZER_PIN, OUTPUT); // Set the buzzer pin to output mode
    playMelody(); // play
}
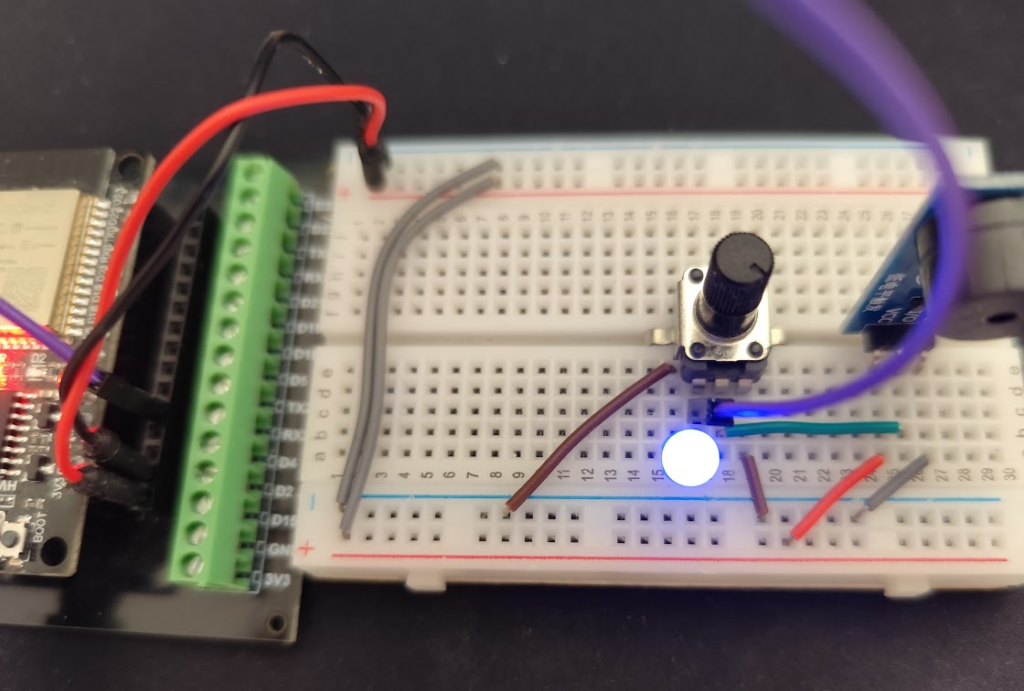
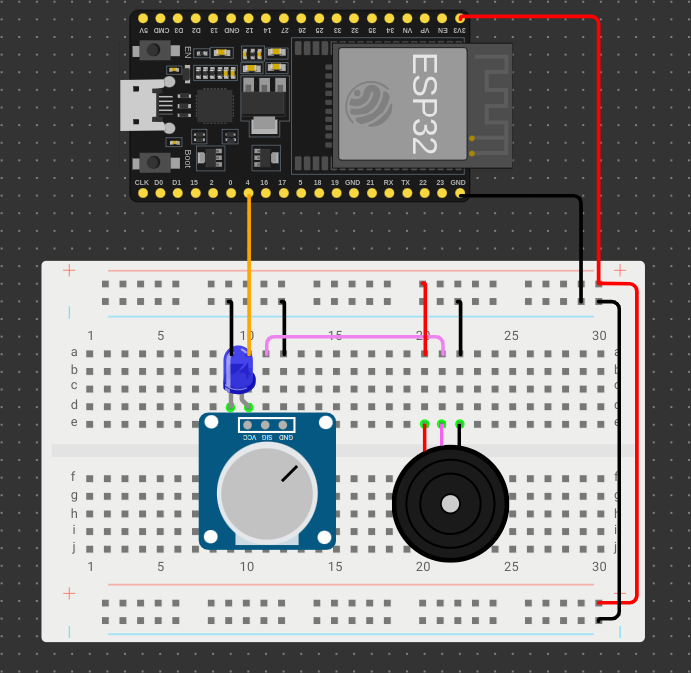
Sadly this program does not work in Wokwi as they do not have passive buzzers, but i edited a screenshot of it to make it look like the circuit I built, so that you can easely follow it. Keep in mind that the LED is opcional and does not need to be present.

2 - Adding Multithreading
With the way the program is set right now, no other code can run while you play the song, we will fix that with the use of tasks!
Let’s create a new function very similar to the ‘playMelody’ we already have:
// Task that will play the melody
void playMelodyTask(void* params) // added (void* params)
{
    // Variable that will hold the real note duration
    int noteDuration;
    // Play melody
    for (int i = 0; i < MelodySize; i++)
    {
        // Calculate duration
        noteDuration = 800 / Melody[i].duration;
        // Setup note
        ledcSetup(LEDC_CHANNEL_0, Melody[i].freq * 2, LEDC_TIMER_13_BIT);
        // Set pin
        ledcAttachPin(BUZZER_PIN, LEDC_CHANNEL_0);
        // Play note
        ledcWrite(LEDC_CHANNEL_0, 50);
        // Delay
        vTaskDelay((noteDuration * 1.30) / portTICK_PERIOD_MS); // changed delay to vTaskDelay
    }
    ledcDetachPin(BUZZER_PIN);
    // End task, NEEDS TO BE HERE, WILL CAUSE CRASHES IF MISSING!
    vTaskDelete(NULL);
}
As you could see, very little changed. We added a void pointer in that arguments as required by RTOS, then we changed ‘delay’ to ‘vTaskDelay’ and finally we added ‘vTaskDelete’ to tell the os that this thread should not be rescheduled.
Note: While coding with a Esp32 you should not use delay. Delay blocks the current cpu core while ‘vTaskDelay’ instead of blocking, gives time for other code to run while the current one sleeps. (Example: Wi-Fi will have problems if you use ‘delay’ in your code)
Lastly, we need to run our task, saddly it is not as simple as calling any other function but it isn’t too hard either. In your setup remove the line that calls ‘playMelody’ and add the following:
void setup()
{
    pinMode(BUZZER_PIN, OUTPUT); // Set the buzzer pin to output mode
    xTaskCreate(playMelodyTask, "Melody Task", 1024, NULL, 5, NULL);
}
Let’s tell see what each argument in ‘xTaskCreate’ does:
- The task function to run.
- A name for the Task.
- Size of the stack in words, in our case, 1024 works fine.
- Parameters to pass to the task, in our case, we do not need to pass anything.
- The priority of the Task, in our case, sound is pretty time sensitive, so we need to run it at a high priority.
- The task handle, can later be used to terminate the task or get it’s status, in our case, it is not needed.
Now, if you need to run code on loop, don’t forget to use ‘vTaskDelay’ so that our melody task can have some processing time! For example, we can control a LED in the loop while our melody is playing in a task.
Attention: If you copy this example, do not forget to set the pin 2 mode to output on setup.
Note: In this example Pin 2 is used, that is generally the onboard LED.
void loop()
{
    digitalWrite(GPIO_NUM_2, HIGH);
    vTaskDelay(100 / portTICK_PERIOD_MS);
    digitalWrite(GPIO_NUM_2, LOW);
    vTaskDelay(100 / portTICK_PERIOD_MS);
}
And that’s it, you now know how to play music with a Buzzer on a Esp32 and also how to use tasks to run multiple functions at the same time!
Thanks for reading and stay tuned for more tech insights and tutorials. Until next time, and keep exploring the world of tech!
